
Introduction
APEX Social Sign-In has opened up a whole new world of possibilities for authenticating users into APEX. Whilst it is a catchy name, I propose the name ‘Social Sign-In’ is selling these new authentication capabilities short. I believe ‘Social Sign-In’ actually has far wider reaching implications for both Enterprise and B2C APEX applications.
Background
For sure, APEX Social Sign-In allows you to authenticate users using Google and Facebook and that is great. Many enterprises, however, are using dedicated cloud-based identity management providers such as Okta and Auth0 to authenticate their employees. In addition, B2C web sites and mobile Apps also use these products to handle identity management for their customers. These products provide a host of identity management features such as Single Sign-On, Lifecycle Management, User Management, Multi-factor Authentication to name a few. Being able to use products like these with APEX just by entering a few configurations in a setup page (rather than having to write hundreds of lines of code) is a game changer. It also raises the profile (and credibility) of APEX in an enterprise and consumer setting.
Level set on what is federated identity management
Instead of me taking up space in this post, I came across the following article which is a great primer on federated identity management aimed at developers. https://hackernoon.com/federated-identities-a-developers-primer-655a160d66cb
Level set on what is federated identity management
Instead of me taking up space in this post, I came across the following article which is a great primer on federated identity management aimed at developers. https://hackernoon.com/federated-identities-a-developers-primer-655a160d66cb
Why Use a 3rd Party Identity Provider?
So, why do I even need a third part identity provider? As with most things ‘Cloud’, the answer is security and convenience. Let’s take a look at each of these justifications in a little more detail.
Security
My job is to develop secure, scalable web applications that provide real business value. I am not an expert in cryptography or how you should best prevent user accounts from being compromised. Reputable companies that do nothing else but build identity management solutions, on which their reputation depends, will do a better job than me. Also, in this day and age, you do not want to be responsible for the safe keeping of your user’s credentials. There are more than enough documented nightmare scenarios out there to convince us of that.
Convenience
Let’s say my IT department demands that all users start using two-factor authentication. If I had built my own authentication solution, I am now on the hook for building two-factor authentication into my application. While that sounds like a fun side project, it is certainly not a cheap one. Again, we are back to can I implement this more securely than an expert? Using products like Okta and Auth0, it is simply a matter of enabling the feature (and paying for it). Products like these also take care of forgotten passwords, user on-boarding and many other tedious aspects of providing identity management for your users.
Before Social Sign-In
So, what did we have to do before Social Login was available? I was rudely reminded of this recently when I was asked to build a custom authentication scheme (in APEX 4) to allow users of an internet-facing B2B APEX application to login via Okta. I had to hand code every URL re-direct, every web service call and don’t get me started on how I had to implement the callback to APEX after authentication into Okta. Don’t get me wrong, the fact that this was even possible in APEX 4 is a testament to the flexibility of the APEX Authentication Scheme. There was, however, clearly room for improvement.
With APEX Social Sign-In
All this changed with the introduction of APEX Social Sign-In. For a basic authentication scenario, all you need to do on the APEX side is create a set of Web Credentials and fill out 4 fields in an Authentication scheme. Zero code required!
In a bid to convince the same APEX 4 customer to upgrade to APEX 18.2, I created a demo showing them how easily we could authenticate Okta users using Social Sign-In. For the remainder of this post, I will focus on what configurations were required to complete this demo and authenticate Okta users into APEX.
In a bid to convince the same APEX 4 customer to upgrade to APEX 18.2, I created a demo showing them how easily we could authenticate Okta users using Social Sign-In. For the remainder of this post, I will focus on what configurations were required to complete this demo and authenticate Okta users into APEX.
Example of Social Sign-In with Okta
Let’s start with the obligatory diagram to show what is going on when you authenticate an Okta user into APEX.
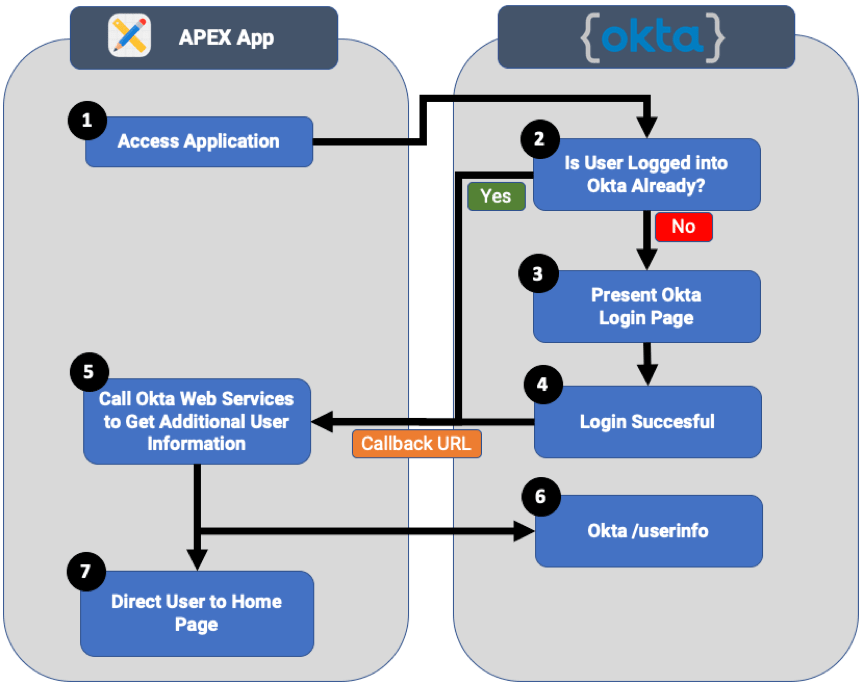
- The user accesses a page in the APEX application. If the user already has a valid APEX session, then they will be allowed to access the page. If they do not, then the APEX authentication scheme will direct the user to Okta.
- If the user already has a valid Okta session, then they will be immediately re-directed back to APEX, otherwise they will be directed to an Okta login page.
- The user will enter their Okta username and password.
- Assuming login is successful, Okta will re-direct the user back to APEX.
- When Okta calls the ‘Callback URL’, it provides a Java Web Token (JWT) which includes the following information:
- The ‘state’, which is a value APEX passed to Okta at the beginning of the flow. APEX will verify that the ‘state’ returned in the JWT matches the one it created at the beginning.
- The user name of the Okta user.
- An authorization code which can be used to use to get a token to call additional Okta web services.
- Once logged in, we can call web services in Okta to get additional information about the user e.g. what groups they belong to, their full name, address etc.
- At this point, APEX will direct the user to the home page of the APEX App.
There, aren’t you glad you didn’t have to code any of that (well at least up until step 6)!
Okta Configuration
Before we get into the APEX configurations, we need to create an Okta account and configure our application in Okta. Okta has a free developer account (https://developer.okta.com/signup/) which allows you to try Okta out.
As previously mentioned, Okta has a whole bunch of features which I won’t get into in this post. Instead I will review the Okta configurations needed for the Demo APEX App to login using OpenID Connect (OIDC). Note: The example below was created using our corporate Okta account, but this should also work using an Okta developer account.
Application Definition
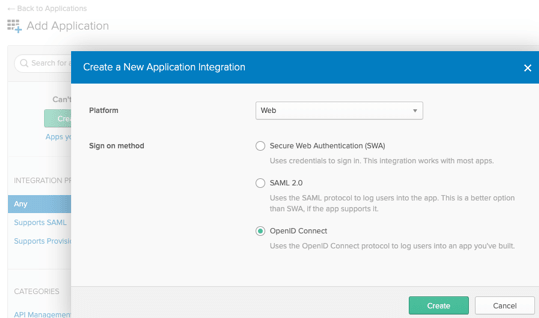
You need to define each application you want to authenticate in Okta. This is much the same as you would for Google or Office365 authentication. Start by Adding an application in Okta, be sure to select Platform = ‘Web’ and Sign on method = ‘OpenID Connect’.
As previously mentioned, Okta has a whole bunch of features which I won’t get into in this post. Instead I will review the Okta configurations needed for the Demo APEX App to login using OpenID Connect (OIDC). Note: The example below was created using our corporate Okta account, but this should also work using an Okta developer account.
Application Definition
You need to define each application you want to authenticate in Okta. This is much the same as you would for Google or Office365 authentication. Start by Adding an application in Okta, be sure to select Platform = ‘Web’ and Sign on method = ‘OpenID Connect’.
The following screen shots show the already configured application followed by descriptions of what values to provide.
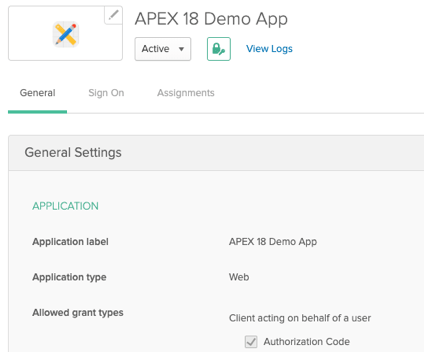
At this stage, we are essentially just picking the Application type and saying we want to use the ‘Authorization Code’ grant type OAuth flow.
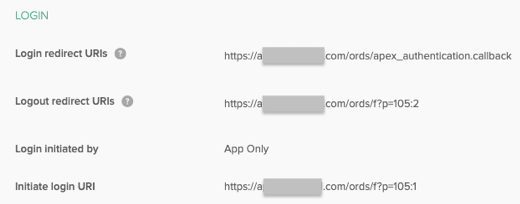
This is the interesting part:
- Login redirect URIs
- This is the APEX URL that Okta will re-direct to when your user has successfully logged into Okta. apex_authentication.callback is a special URL that accepts a JWT from the identity provider and authenticates the user into APEX.
- Logout redirect URIs
- This is the URL that Okta will direct your user to when they logout.
- Login initiated by
- Here you can decide if only your App can initiate login or if login can be initiated by Okta. We want ‘App Only’.
- Initiate login URI
- This is not applicable when Login initiated by is ‘App Only’.
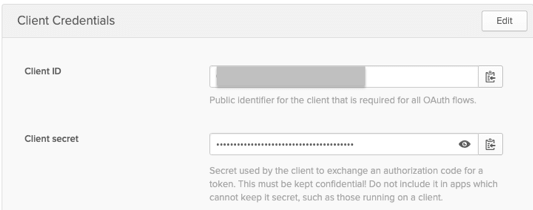
Okta will generate client credentials for each Application you create. We will use these when creating our APEX ‘Web Credentials’ below.
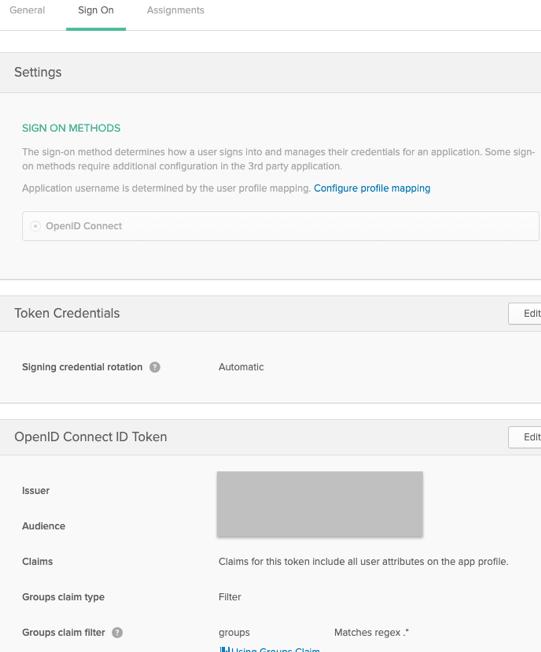
In the above section, we are identifying that we want to use OpenID Connect as our authentication method.
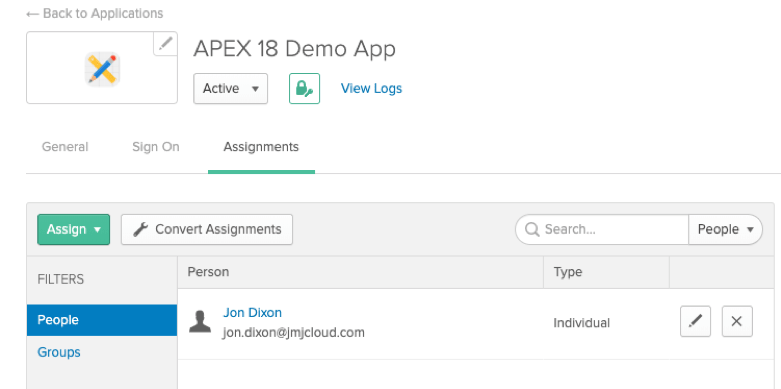
Finally, in the above section, we can determine which Okta users (and or Groups) should have access to our Application.
APEX Configuration
With our Okta configurations complete, we can now configure our APEX Authentication Scheme.
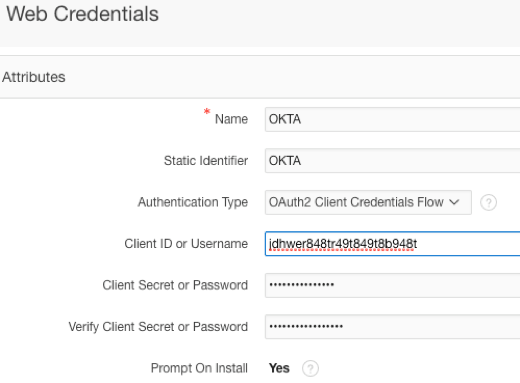
Web Credentials (these come from Okta)
Start by creating a set of ‘Web Credentials’. Here you will provide the Client ID and Client Secret provided by Okta above.
Web Credentials (these come from Okta)
Start by creating a set of ‘Web Credentials’. Here you will provide the Client ID and Client Secret provided by Okta above.
Authentication Scheme
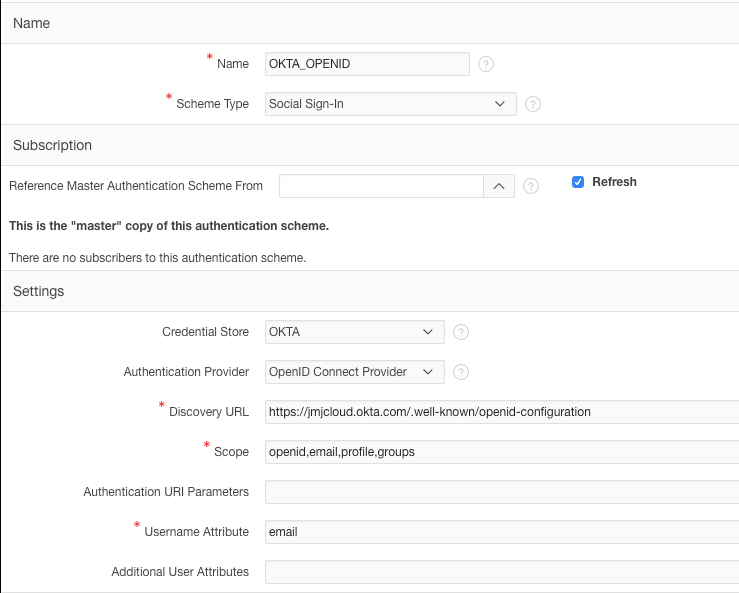
- Credential Store
- This is the credential store we defined previously.
- Authentication Provider
- I chose ‘OpenID Connect Provider’ because a) it is supported by Okta and b) it involves the least configuration. It essentially self discovers all of the information it needs to authenticate against the provider from a JSON document which is publicly accessible.
- Discovery URL
- This is the discovery URL which APEX uses to find out everything it needs to know to authenticate against the provider. Okta provides this information via a JSON document. The JSON document includes all of the web service end-points (/token, /userinfo, /logout etc.), supported scopes etc.
- Scope
- The list of scopes determine what pieces of additional information about the user you are allowed to fetch after login to Okta. This information can be accessed by calling the Okta /userinfo web service. In this example, I can get openid information, email address, user profile information and the groups a user belongs to.
- Username Attribute
- This is the attribute returned from Okta that APEX uses to set the APEX username (:APP_USER) of the logged in user.
And, that is it, the APEX configuration is complete!
Other Information
Patching for APEX 18.2
If you are running APEX 18.2, be sure to apply the PSE bundle patch for APEX 18.2 ‘Patch 28727865: PSE BUNDLE FOR APEX 18.2 (PSES ON TOP OF 18.2.0.00.12)’. This fixes a bug when using ‘OpenID Connect Provider’ as the ‘Authentication Provider’ in your authentication scheme.
Firewalls, Wallets and Proxies
If you are working with APEX on-premise you have to consider how APEX is going to call out to the identity provider and how the identity provider is going to be able to callback into APEX. For the call out to happen, you have to either install the appropriate certificates from the identity provider in a wallet on your database server or create a proxy to facilitate this. You may also have to create ACLs to even allow network traffic to leave your database. For the identity provider to make the callback, your APEX environment must be accessible to the internet.
Conclusion
In this post, I have tried to illustrate how easy it is to configure APEX Social Sign-In to authenticate APEX users with products like Okta. Okta is one of many cloud identity management providers that you can use to for handling identity management for your APEX users. With APEX Social Sign-In there are less and less reasons to store passwords in your database.
Hopefully I have convinced you that its scope reaches far beyond Twitter and Facebook. So, what name should we use instead of 'APEX Social Sign-In'? My vote goes for 'Super simple mechanism for logging users into APEX using just about any consumer or enterprise identity provider you care to mention with zero code'. Something tells me, however, this won't fly with the marketing folks!
Hopefully I have convinced you that its scope reaches far beyond Twitter and Facebook. So, what name should we use instead of 'APEX Social Sign-In'? My vote goes for 'Super simple mechanism for logging users into APEX using just about any consumer or enterprise identity provider you care to mention with zero code'. Something tells me, however, this won't fly with the marketing folks!
Author
Jon Dixon Co-Founder JMJ Cloud
 RSS Feed