
Securing the ORDS REST services you develop is one of your fundamental responsibilities as a developer. There are very few valid use cases where where it is ok to allow unfettered access to get or update data.
Luckily for us, Oracle REST Data Services offers two approaches for securing our services using an industry standard web service authentication protocol called OAuth2.
ORDS provides two options for securing your REST web services using OAuth2:
Luckily for us, Oracle REST Data Services offers two approaches for securing our services using an industry standard web service authentication protocol called OAuth2.
ORDS provides two options for securing your REST web services using OAuth2:
- 'Two-legged' OAuth involves two parties, the party calling the RESTful API (the third party application), and the party providing the RESTful API. Two legged flows are typically used in server to server interactions where the calling server can securely store the credentials required to access the service. In OAuth 2.0 this flow is called the client credentials flow. It is most typically used in business to business scenarios.
- 'Three-legged' OAuth involves three parties, the party calling the RESTful API, the party providing the RESTful API, and an end-user party, who owns/manages the data that the RESTful API provides access to. Three legged flows are used in client to server interactions where an end-user must approve access to the RESTful API. In OAuth 2.0 the authorization code flow and the implicit flow are three legged flows. These flows are typically used in business to consumer scenarios.
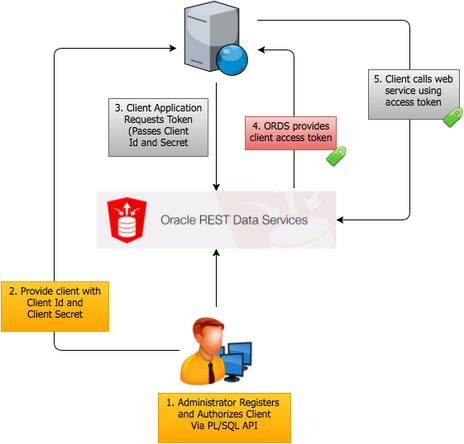
- You develop a REST service in ORDS and secure it. You then register a 'client' application with ORDS.
- You provide the client application (usually to the administrator) the client id and client secret generated from the client registration. The client application stores the client id and client secret securely on their server.
- The client application makes a call to a special ORDS URL passing their client id and client secret.
- ORDS responds with an authorization token. By default, the token will remain active for 3,600 seconds (1 Hour).
- Once the token is obtained, the client calls the appropriate service, passing the token to gain access to the service.
Securing Your REST Service
By default, a newly created web service is unsecured. Follow these steps to create a privilege and associate it with a service in order to secure it.
The below example assumes you have done the following:
The below example assumes you have done the following:
- Enabled ORDS in schema 'REST' using ORDS.ENABLE_SCHEMA.
- Created a module called 'v1' using ORDS.DEFINE_MODULE.
- Created a template with a pattern of 'customer' using ORDS.DEFINE_TEMPLATE.
- Created a GET handler that contains your PL/SQL logic using ORDS.DEFINE_HANDLER.
- At this point, in an unsecured state you could call this service using:
- https://example.com/ords/rest/v1/customer
Associate the privilege with a your web service:
Where:
- p_priviledge_name
- The name you want to give the privilege.
- p_pattern
- Is the service you want to secure. In the above example /v1/ is the module URI, and /customer is the service name.
- Note: You can use wild cards here, so you could assign all services in a module to a privilege by using ‘/v1/*’.
Creating A New Client and Associate Privilege(s)
Now that we have our web services secured, we need to create a ‘Client’ and associate the client with one or more privileges. We are going to create a client called 'ABC INC Sales System'. ABC Inc's sales system is going to consume our customer API to get real time customer information from our customer service.
Where:
- p_name
- Name of the client application.
- p_grant_type
- Will always be ‘client_credentials’. This is the 2-legged OAuth approach.
- p_priviledge_names
- Comma delimited list of privilege names.
Obtaining An Authorization Token
Before the client application can call our secured service, they will first need to obtain an authorization token. This is done by calling a special ORDS REST service ‘.../oauth2/token’ with the POST method. In our example, the end point would be:
- https://example.com/ords/rest/oauth2/token
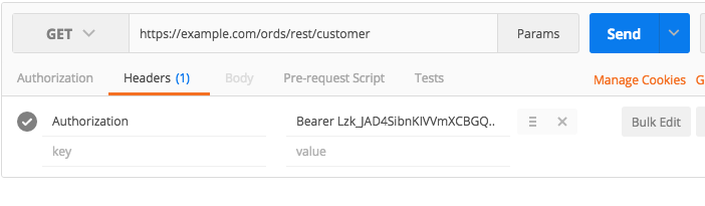
One you have a token, you can then call your secured service by passing the token in the HTTP header as follows:
Extending the Token
By default, the token expires after 3,600 seconds (or 1 Hour). When calling secured services in ORDS, the service will return a http code of 401 when the token has expired. On receiving a 401 code, the client needs to obtain a fresh token by again calling the ‘.../oauth/token’ service.
Changing the default Expiration
See my post ords-changing-the-default-oauth2-token-expiry-lifetime.html for details on how to change the default expiration.
Changing the default Expiration
See my post ords-changing-the-default-oauth2-token-expiry-lifetime.html for details on how to change the default expiration.
 RSS Feed