
Introduction
The use of Microsoft Teams grew exponentially in 2020. Thanks to Inbound and Outbound Webhook functionality in Teams and the killer combination of Oracle APEX and Oracle Rest Data Services (ORDS), it is easier than ever to incorporate Teams messaging into your APEX Applications. In this post, I will describe how you can send feature rich messages to users in Teams from your APEX Apps and how you can create simple Chatbots using Teams which can interact with your APEX Apps using ORDS.
Background
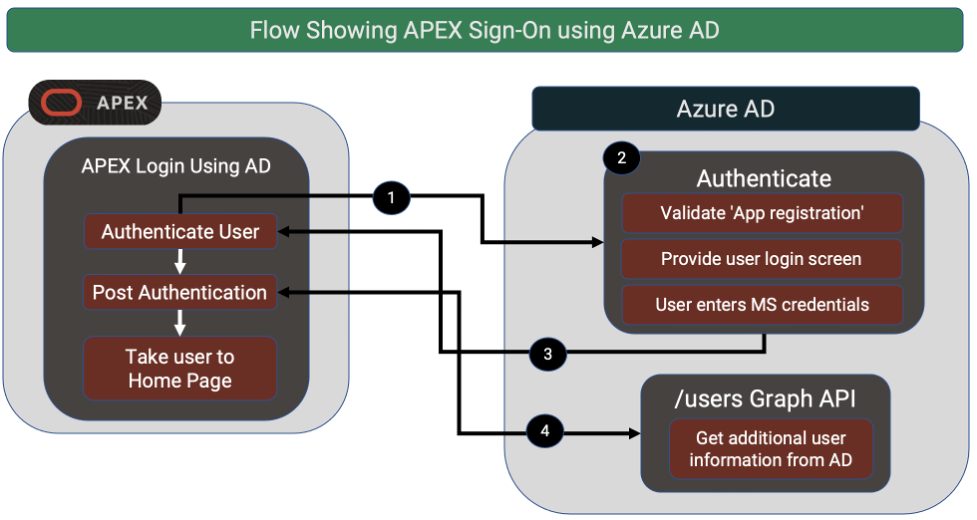
Teams allows you to bring together people from around your organization into permanent or Ad-Hoc teams for increased collaboration. It also combines with other Office 365 services like Calendar and SharePoint to further enhance collaboration. None of the Teams integrations I am going to describe utilize MS Graph APIs in any way. You don’t even need to create an Active Directory ‘App registration’. Instead, communication between Teams and your APEX application is handled using Inbound and Outbound Webhooks.
Teams Terminology (Teams and Channels)
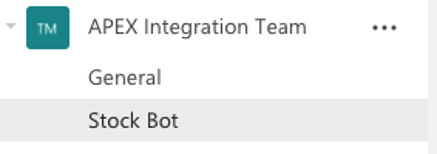
The screen shot below shows a team called ‘APEX Integration Team’ which has two Channels ‘General’ and ‘Stock Bot’. Channels allow you to break out communication within a team between different subjects.
Teams Terminology (Teams and Channels)
The screen shot below shows a team called ‘APEX Integration Team’ which has two Channels ‘General’ and ‘Stock Bot’. Channels allow you to break out communication within a team between different subjects.
Outbound Webhooks
Outbound webhooks allow you to create a simple Chatbot for a Team. In Teams, you configure the URL you want Teams to call when the Webhook is invoked. In our case, this URL will be an ORDS web service (more on that later). Whenever a user @mentions the Webhook from within a Channel, Teams sends a JSON payload to the URL endpoint specified in the Outbound Webhook definition. The JSON payload contains details of the user who invoked the Webhook, the conversation ID, the channel and of course the text that was entered by the user.
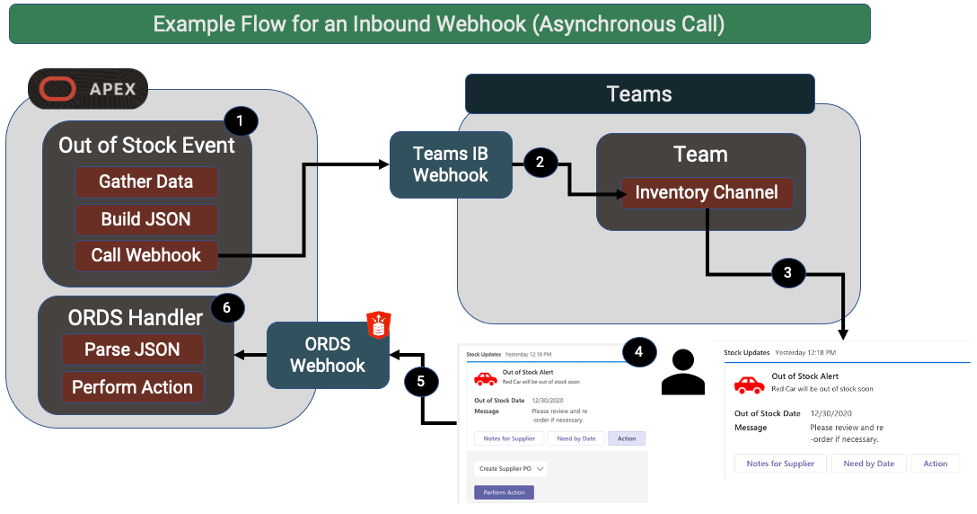
The diagram below shows the flow of information from the point the user sends a message to the Outbound Webhook (step 1) up to the point where the response from the ORDS Service is displayed to the user in Teams (step 6).
The diagram below shows the flow of information from the point the user sends a message to the Outbound Webhook (step 1) up to the point where the response from the ORDS Service is displayed to the user in Teams (step 6).
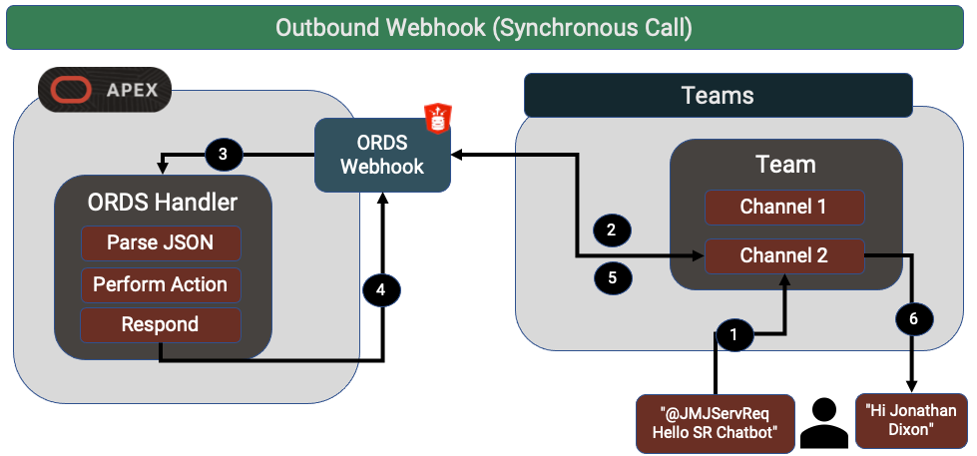
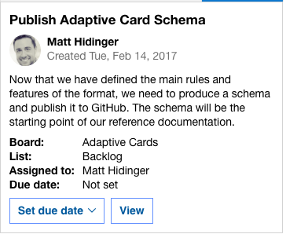
In our case we are using ORDS to create an endpoint by creating a Module, Template and POST Handler. The PL/SQL code in the POST handler is responsible for parsing the JSON sent by Teams, running PL/SQL code to perform the action requested by the user, and then responding with a reply in the REST service response. Teams calls your endpoint synchronously and gives you 5 seconds to complete your response. Teams then takes your response and displays it to the user in the Teams client application.
Here is a screen shot of an example interaction. The User @mentioned an outbound Webhook called ‘JMJ ServReq’ and sent the message ‘Hello SR Chatbot’.
Here is a screen shot of an example interaction. The User @mentioned an outbound Webhook called ‘JMJ ServReq’ and sent the message ‘Hello SR Chatbot’.
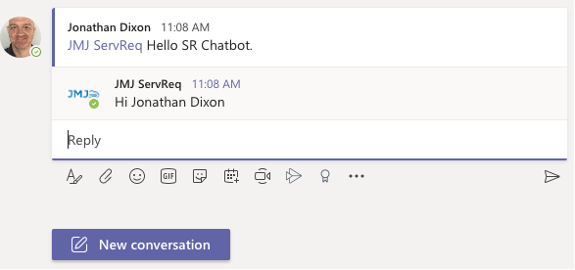
The ORDS Webhook was called by Teams, our PL/SQL code parsed the JSON sent by Teams and pulled out the user’s name. Finally, the PL/SQL generated a JSON response which included the user’s name.
Example Use Cases
Security
When a user messages your Webhook, you can assume they have been authenticated by Microsoft. You cannot, however, assume they are authorized to use your chatbot. You should include your own code to verify that the user which sends the message is allowed to use the Chatbot. In addition, to ensure that your service is receiving calls only from actual Teams clients, Teams provides an HMAC Code in the HTTP ‘hmac’ header.
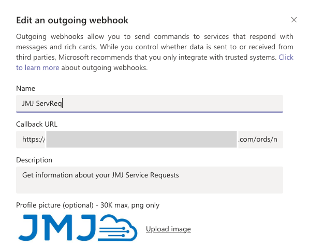
Teams Setup
Here is a screen shot showing the setup of the Outbound Webhook in Teams. It is as simple as providing the URL for your ORDS Endpoint.
Example Use Cases
- Get information from Oracle EBS or ERP Cloud. A user types “@ebs How much of item XYZ is left in stock” into a Teams channel created for a particular warehouse. Your ORDS end point would then get the on-hand inventory for the item in that warehouse and responds to the user with the quantity.
- Perform actions in EBS or ERP Cloud. A user types “@erpcloud cancel order #102202” into a Teams channel. Your ORDS service checks if the order is open and replies, “Are you sure?” you then respond “@erpcloud Yes”. Your ORDS service recognizes it is the same conversation and you have confirmed cancellation and proceeds to cancel the order using ERP Cloud Web Servcies. Note: Because Teams keep track of a “conversation” you can respond to the user asking them questions about their inquiry (just like a chatbot does).
Security
When a user messages your Webhook, you can assume they have been authenticated by Microsoft. You cannot, however, assume they are authorized to use your chatbot. You should include your own code to verify that the user which sends the message is allowed to use the Chatbot. In addition, to ensure that your service is receiving calls only from actual Teams clients, Teams provides an HMAC Code in the HTTP ‘hmac’ header.
Teams Setup
Here is a screen shot showing the setup of the Outbound Webhook in Teams. It is as simple as providing the URL for your ORDS Endpoint.
ORDS POST Handler Setup
In our very simple example, the ORDS handler PL/SQL code looks like the below code block. In real life, you are going to need additional code to validate the sender is Teams, determine if the user is authorized to perform the required action in your system, and build a JSON document to respond to the user.
In our very simple example, the ORDS handler PL/SQL code looks like the below code block. In real life, you are going to need additional code to validate the sender is Teams, determine if the user is authorized to perform the required action in your system, and build a JSON document to respond to the user.
Inbound Webhooks
Inbound Webhooks are a special type of Connector in Teams that provide a simple way for an external app to share content in Teams. Teams provides a unique URL to which you POST a JSON payload with details of the message. The timing of when the message is posted is completely up to you so it can be based on an event that occurs in your application.
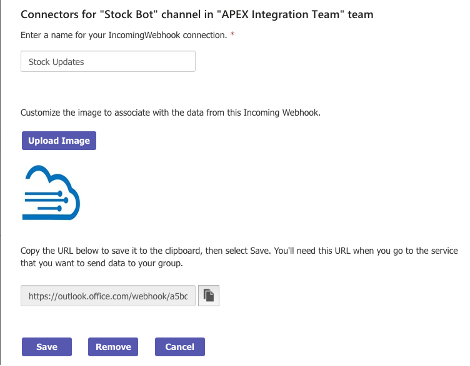
Teams Setup Incoming Webhook Connector
The URL generated when you create the connector is the URL you will POST messages to. These messages will then show up in the channel which you created the connector in.
Message Formatting Options
There are several options for formatting the messages you send to Teams. The most flexible is to use Cards. Cards provide the ability for users to respond to the message using multiple input options like free form text, date pickers and select lists. The layout of the card and the actions a user can perform on the card are all defined in the JSON payload you send to Teams (step 1 in flow diagram above).
There are several options for formatting the messages you send to Teams. The most flexible is to use Cards. Cards provide the ability for users to respond to the message using multiple input options like free form text, date pickers and select lists. The layout of the card and the actions a user can perform on the card are all defined in the JSON payload you send to Teams (step 1 in flow diagram above).
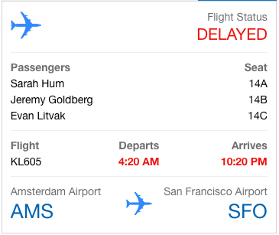
Actionable Message Cards Vs Adaptive Cards
It seems that Microsoft is in the middle of transitioning their cards interface from legacy Actionable Message Cards to Adaptive Cards. At the time of writing this post, Adaptive Cards do not allow you to post a user’s response to a card to your own http endpoint (see step 4 and 5 in the flow diagram above). In view of this, if you need a response to the card in Teams then for now you must use Actionable Message Cards. If you do not need a response then I recommend using Adaptive cards, as these are surely the future. From here on in, I will simply use the term ‘Cards’.
For design ideas, check out the Adaptive Card Samples which provide several sample card layouts and the Designer, which allows you to enter your own JSON and see what your cards will look like. You can find sample Actionable Message Cards here.
Other Card Features
The power of cards in the Microsoft ecosystem does not stop there. For example, you can send cards in emails and make them part of your approvals workflow using Power Automate. When a user responds to a card you can have your API send back a new card with refreshed information based on the users response. You can even pro-actively send updated information to a card that you already sent to prevent the data from becoming stale.
Example Inbound Webhook Use Case with User Response Via Card
Inventory Level Monitor. Let’s say you wanted to inform management whenever on-hand inventory in Oracle e-Business Suite (EBS) for a product went below a certain level. You can create an ‘Incoming Webhook Connector’ and attach it to a channel within your Purchasing Team. In EBS we could create a Concurrent Program which runs intermittently and posts a JSON payload to the Webhook whenever a product’s inventory drops below a certain level. The post is performed by calling the APEX_WEB_SERVICE PL/SQL API. Here is an example of a card that appears in a Teams Channel when the Inbound Webhook is invoked.
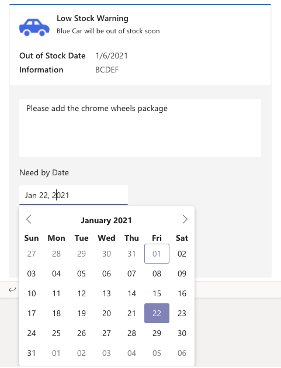
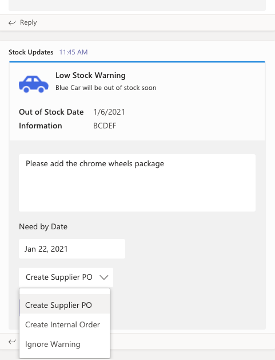
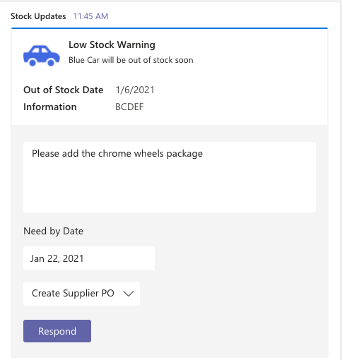
In the JSON message we send to the Webhook (see sample below), we included details about the card such as the title, sub-title, custom entry fields, the icon to display and an action button for the user to respond with. When the users enter notes, the need by date and clicks ‘Respond’, their responses are posted back to an ORDS POST web service that we created. In this example, Your ORDS web service could then create a PO in Oracle EBS.
Example JSON payload for an Actionable Message Card
This is an example payload posted to an Inbound Webhook Connector URL. It is the exact JSON used to create the card examples above. It contains details of the card to show the user in Teams in addition to the ORDS service to POST user responses to.
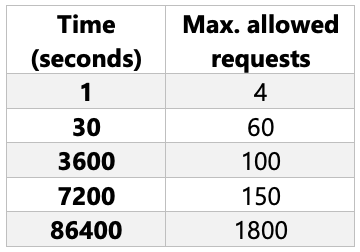
Rate Limits
As with many MS services, there are rate limits for Connectors. At time of writing this post they are as follows. If you exceed these limits, you could start getting http ‘429’ errors.
As with many MS services, there are rate limits for Connectors. At time of writing this post they are as follows. If you exceed these limits, you could start getting http ‘429’ errors.
Conclusion
I have barely scratched the surface with what is possible with Inbound and Outbound messaging between APEX/ORDS and MS Teams. The combined power of APEX & ORDS combined with the Office 365 ecosystem is a powerful combination which cannot be ignored (especially in a corporate setting). I encourage you to dig deeper and incorporate Office 365 into your APEX Application wherever it makes sense.
Author
Jon Dixon Co-Founder JMJ Cloud


 RSS Feed