JMJ CLOUD
  • Home
  • Projects
  • Blog
  • About Us
  • Contact Us

Our Blog

Tuning Tomcat for APEX/ORDS in Production

1/14/2017

5 Comments


Introduction

Picture
In a previous post Tuning GlassFish for APEX/ORDS in Production I described the steps to configure ORDS and GlassFish for production use. In this post, I will turn my attention to Tomcat and see what needs to be done to get Tomcat production ready for ORDS and APEX. I will focus purely on the Tomcat configurations as I already covered the ORDS side in the previous post.

Like GlassFish, out of the box, Tomcat comes configured for use in a development environment. You will see many of the same limitations as Glassfish when considering production use:
  • Tomcat will be running in development mode (which incurs an overhead in checking to see if code has changed)
  • If you have more than 1 CPU, you will not be taking advantage of it
  • Tomcat will only assign 512m of ram to the JVM (and ORDS), even if you have more available
  • Logging will be set to FINE and INFO, adding a logging burden to Tomcat
  • You are in danger of timing out on large file uploads

Setting the Scene

I will use the same example as I did previously. I am going to assume an actively used system with 250 users and an anticipated peak load of 50 sessions. We are assuming that only 50 of these 250 users could be clicking on an APEX button (or making and Ajax request) at exactly the same time requiring all 50 JDBC connections. We are assuming a normal load of 20 concurrently active users. I am going to assume we have a dedicated web server running ORDS and Tomcat with 4GB RAM and 1 Quadcore CPU. The configurations discussed here assume Tomcat version 8.5.6.

Tomcat Configurations

Follow your normal routine for downloading and installing the JDK and Tomcat. I will be calling out the name of the configuration file that needs to be created/changed as well as the setting within the file. I will assume $CATALINA_HOME refers to the root of your Tomcat install folder. So if you installed Tomcat at /opt/tomcat you would see sub-directories of bin, conf, logs etc. making $CATALINA_HOME = /opt/tomcat

Logging
Configuration File: $CATALINA_HOME/conf/logging.properties
Change all occurrences of FINE and INFO to SEVERE

JVM Options
To pass JVM options to Tomcat on startup, you should create a new file called $CATALINA_HOME/bin/setenv.sh

Add the following values:
export CATALINA_OPTS="$CATALINA_OPTS -Xms1536m"
export CATALINA_OPTS="$CATALINA_OPTS -Xmx1536m"
export CATALINA_OPTS="$CATALINA_OPTS -server"
Note: If you are running JDK7, you can also set PermSize and MaxPermSize. Note: PermSize and MaxPermSize not applicable for Java 8.
export CATALINA_OPTS="$CATALINA_OPTS -XX:PermSize=256m"
export CATALINA_OPTS="$CATALINA_OPTS -XX:MaxPermSize=256m"

Main Tomcat Server Configurations
We are going to be configuring Tomcat on Port 8080.
Configuration File: $CATALINA_HOME/conf/server.xml

Add the following under the Catalina Service:

    
Notes:
  • acceptorThreadCount - The number of threads to be used to accept connections. Increase this value on a multi CPU Core machine.
  • acceptCount - The maximum queue length for incoming connection requests when all possible request processing threads are in use. Any requests received when the queue is full will be refused. Set to 10 to protect server from getting overloaded.
  • maxConnections - The maximum number of connections that the server will accept at any given time. When this number has been reached, the server will accept, but not process, one further connection. Connections are passed on to available threads to perform the actual work.
  • maxThreads - The maximum number of request processing threads to be created by a connector, which therefore determines the maximum number of simultaneous requests that can be handled.
  • minSpareThreads - The minimum number of threads always kept running waiting for new requests.
  • connectionTimeout - The number of milliseconds a connector will wait, after accepting a connection, for the request URI line to be presented.
  • disableUploadTimeout - Set to false and use the value in connectionUploadTimeout as the upload timeout.
  • connectionUploadTimeout - Specifies the timeout, in milliseconds, to use while a data upload is in progress. This only takes effect ifdisableUploadTimeout is set to false.

Note: The threads described above do not impact JDBC connection pooling, which ORDS is handling for us. ORDS is protecting (or throttling) the JDBC connections Tomcat is organizing the web connections. If we assume the MaxLimit JDBC connection setting in ORDS is 50 then we have a healthy overhead of connections over to queue any users we have over 50.

Conclusion

The above settings are a guideline for configuring Tomcat to run ORDS in a fictitious production environment. As with all things performance, you will still need to go through the exercise of adding load to your system and finding the right settings for your hardware, users, data etc. The good news is, you now know which levers to pull!
5 Comments

Oracle APEX Instant Modal

1/1/2017

2 Comments


Introduction

Picture
There are several methods for displaying additional information on an APEX 5 page. These include an in-line modal dialog (in the same page), a modal dialog page (in a separate page) and of course mouse over events with custom JS and CSS. In this post, I am going to cover the in-line modal dialog with a speedy twist.


We often need to display additional information for a record in a report. If users only infrequently access the additional information, then a modal dialogue page is the way to go. It allows greater re-use and keeps your main report page cleaner.

If, however, your users need to access that additional information frequently the separate page modal is a little slower. APEX must make an additional round trip to the database to load the modal page and run the associated SQL.

Using an in-line modal dialog provides some benefit as the region is loaded with your report page. There is still some overhead, however, in running the SQL to fetch the additional information.

The best of all worlds would be to have the additional information fetched during the report page load and pass that data to the in-line dialogue to display. No extra page load and no extra round trip to the database.

The Finished Product

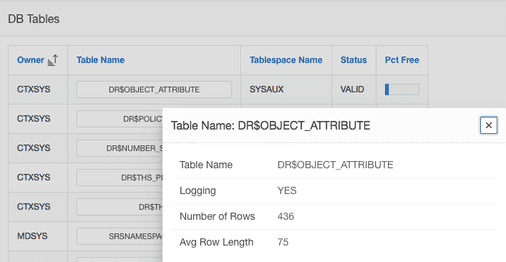
I have a page with just two regions containing a Classic Report region and a Inline Dialog region. The report queries all_tables and the in-line dialog shows additional information for a table when the user clicks on the table name. Here is a look at the finished product with the popup.
Picture

Demo Page Structure

Region - DB Tables (Type: Classic Report, Template: Standard)
To deliver the detailed information for the modal instantly, we must get the information during the main report query. I am doing this by adding a column which builds some JSON for each row which contains the additional information.

    
The 'table_name' column is defined in the report as follows:
​Link Text:
<span class="t-Button t-Button--small t-Button--simple t-Button--stretch t-Icon">#TABLE_NAME#</span>

Link Attributes:
class="xxClickPopupClass" data-id="#TABLE_NAME#" data-jsonString="#POPUP_DATA#"
  • xxClickPopupClass is the class we are going to use to trigger our Dynamic Action on Click
  • data-jsonString is going to contain our Jason data with the additional details
The column 'POPUP_DATA' should be Hidden.

Region - Record Detail (Type: Static Content, Template: Inline Dialog)
This region is the modal that will show the additional details when the user clicks on a table.
Static ID:
recordDetailModal
Text:
<div id="popupContent"></div>
  • popupContent is the DIV we will replace with the detail content for the table clicked by the user.
​
Dynamic Action
Now we have the structure in place, it's time to bring the modal to life. The dynamic action should be triggered on Click using the class xxClickPopupClass to trigger the action. The use of the Static Container is to limit the scope of the ​xxClickPopupClass.
The Javascript for the Dynamic action is below, hopefully it is pretty self explanatory. I have tried to keep the code generic in order to make it re-usable.

    
Styling
I have re-used classes from the Classic Report Template Option 'Value Attribute Pairs - Column' to format the dialog data. The javascript above is dynamically building HTML that looks like the HTML below.


Conclusion

This is not overly complex as APEX goes, but it does illustrate that with a little thought you can improve your end users experience without too much additional effort. Of course, there is some overhead in fetching the additional JSON column when the user may never view it. As with all things you need to weigh this with your specific use case. Having said that, a fraction of a second saved frequently adds up when measured across many users. 
2 Comments

    RSS Feed

    Popular Posts

    - APEX Dog Food
    - Cloud ERP & APEX Mashup
    - Modernizing EBS with APEX
    - Easy APEX_WEB_SERVICE
    - Running APEX in RDS
    - ORDS What & Why?

    Categories

    All
    APEX
    AWS
    Fusion Cloud ERP
    INTEGRATION
    MS GRAPH
    OCI
    ORDS
    PaaS
    RAD
    REST
    SOAP

    Archives

    October 2021
    February 2021
    January 2021
    October 2020
    September 2020
    June 2020
    May 2020
    April 2020
    February 2020
    January 2020
    October 2019
    September 2019
    August 2019
    July 2019
    June 2019
    April 2019
    March 2019
    February 2019
    January 2019
    December 2018
    November 2018
    October 2018
    September 2018
    August 2018
    July 2018
    June 2018
    May 2018
    April 2018
    March 2018
    February 2018
    January 2018
    September 2017
    August 2017
    July 2017
    June 2017
    February 2017
    January 2017
    December 2016
    November 2016
    October 2016
    September 2016
    August 2016
    July 2016

Company

About
Contact
Blog
  • Home
  • Projects
  • Blog
  • About Us
  • Contact Us