JMJ CLOUD
  • Home
  • Projects
  • Blog
  • About Us
  • Contact Us

Our Blog

APEX 20.2 - First Look at REST Data Source Synchronization

10/11/2020

0 Comments


Introduction

The Pre-Production Release of APEX 20.2 is now available on apex.oracle.com!   There are lots of new and useful features that we can't wait to start using.   In this article, we'll have a look at the new REST Data Source Synchronization feature will be super handy when using APEX to extend ERP Cloud.   We gave this a runout on apex.oracle.com, using it to pull down ERP Cloud Organizations into an APEX table on a set schedule.

Step 1 - Configure the REST Data Source

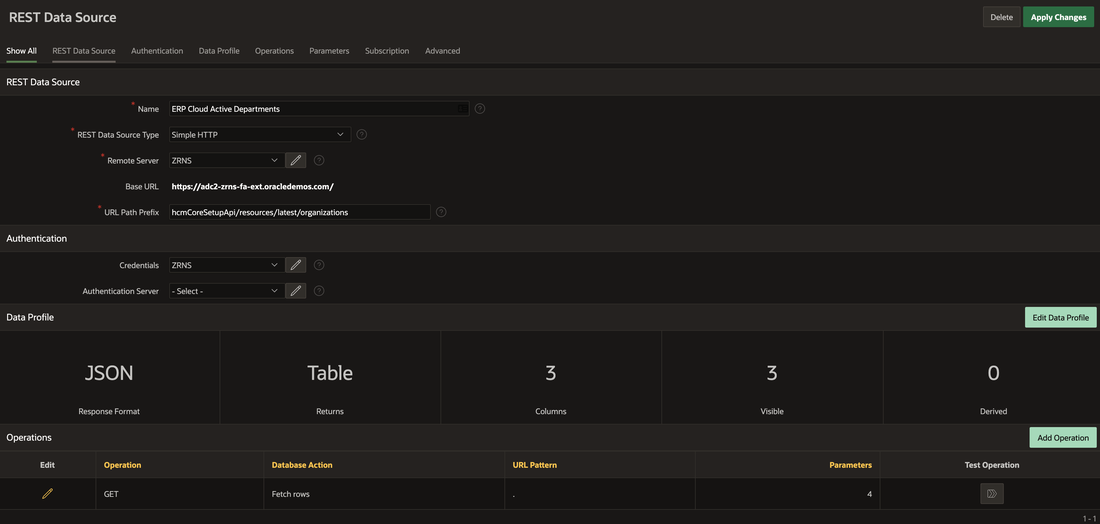
We configured the REST Data Source as below, using APEX Web Credentials to connect to the Vision Demo ZRNS environment, configuring the organizations HCM rest service to return the following fields for all active departments:  OrganizationId, Name and Active .
Picture
Query String variables are used to configure the selection criteria and data returned.
Picture
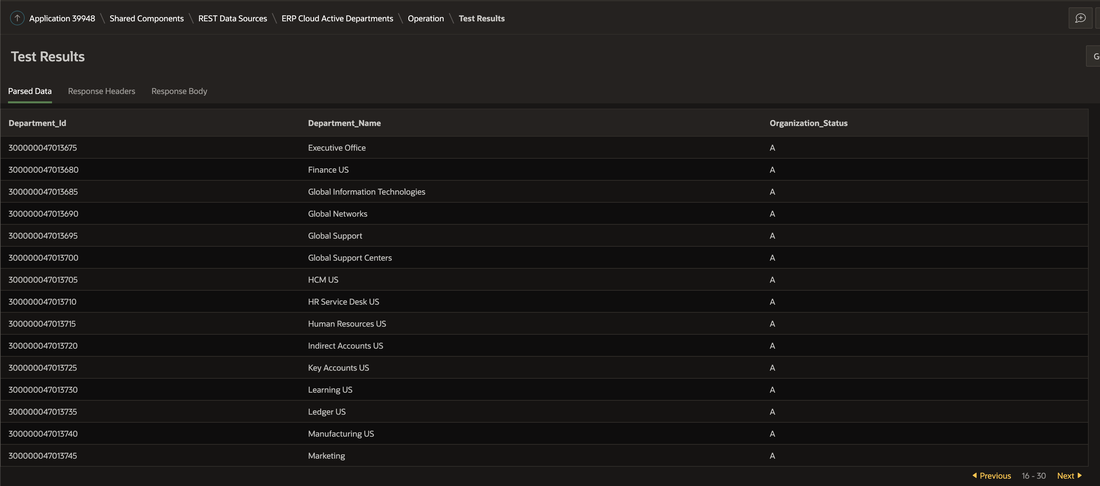
Before attempting synchronization, we test the web service call to make sure it is functioning correctly.
Picture
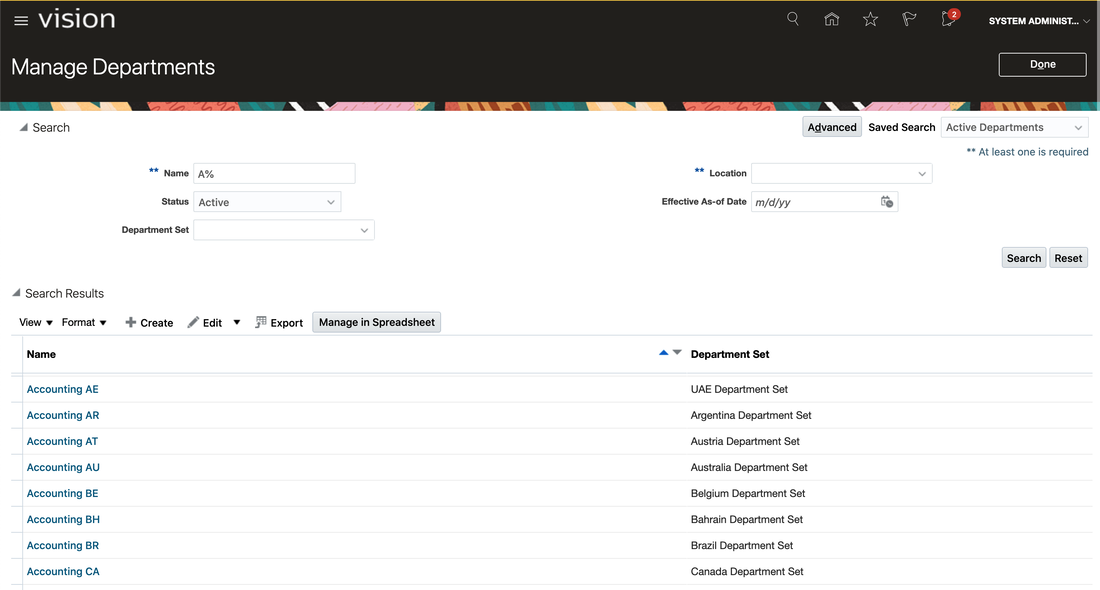
We can check this for accuracy against the source data in ERP Cloud.   

Note, Vision is shown  below with the Redwood theme; we're looking forward to trying out the new APEX 20.2 Redwood Light Theme for our ERP Cloud Integrations.
Picture
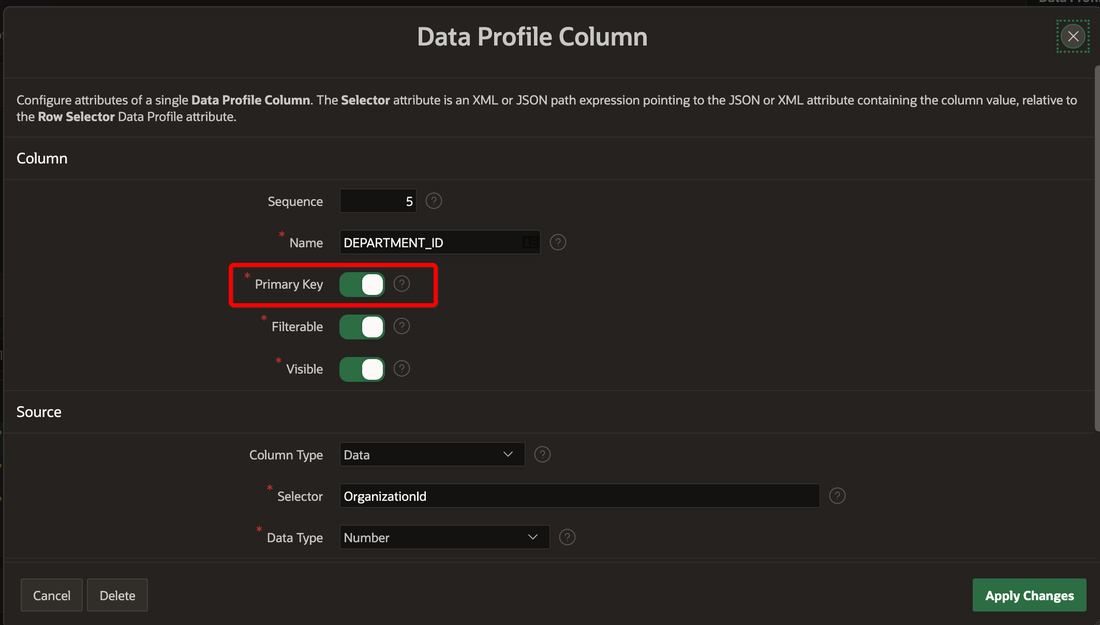
An important step is to identify the Primary Key of the returned data; this is used if you're Merging the data every time it is synchronized.
Picture

Step 2 - Configure Synchronization

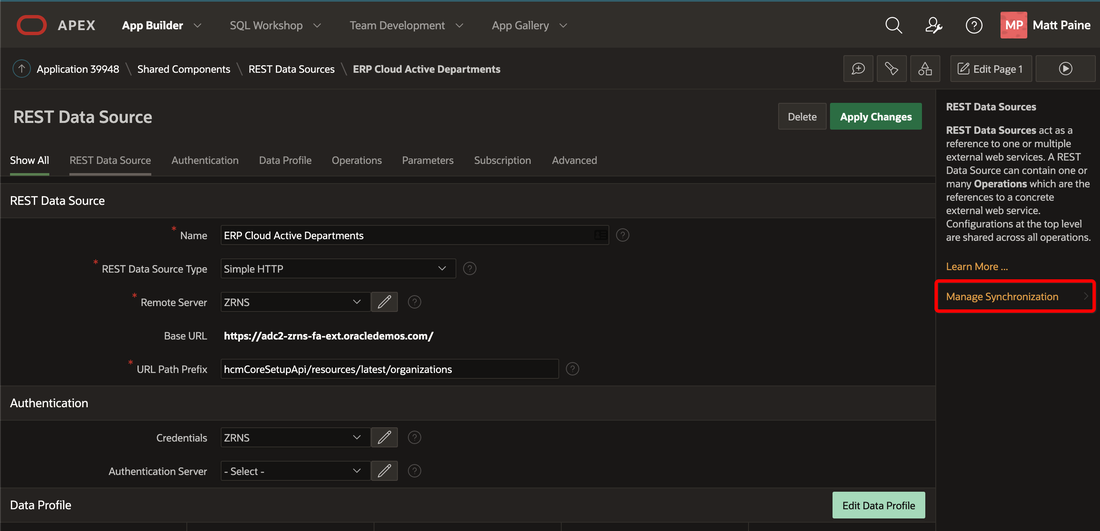
We clicked on the new Manage Synchronization link to start the configuration process.
Picture
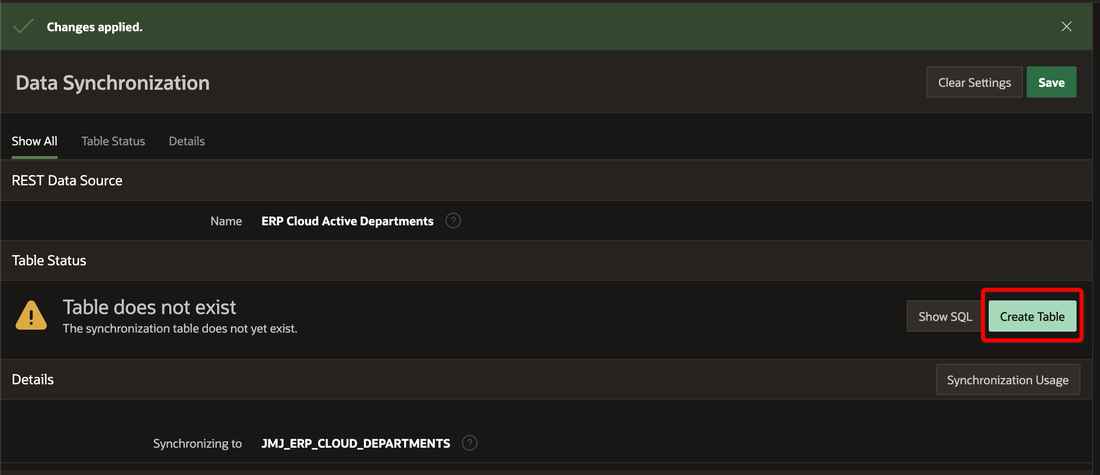
Here we choose a target table.   
Picture
If none exists, APEX will create a new table for you with columns matching your REST Data Source.   

Note, If your REST Data Source changes at a later time, for example if columns are added or renamed,  APEX can generate and apply the DDL required to bring the table in line.
Picture
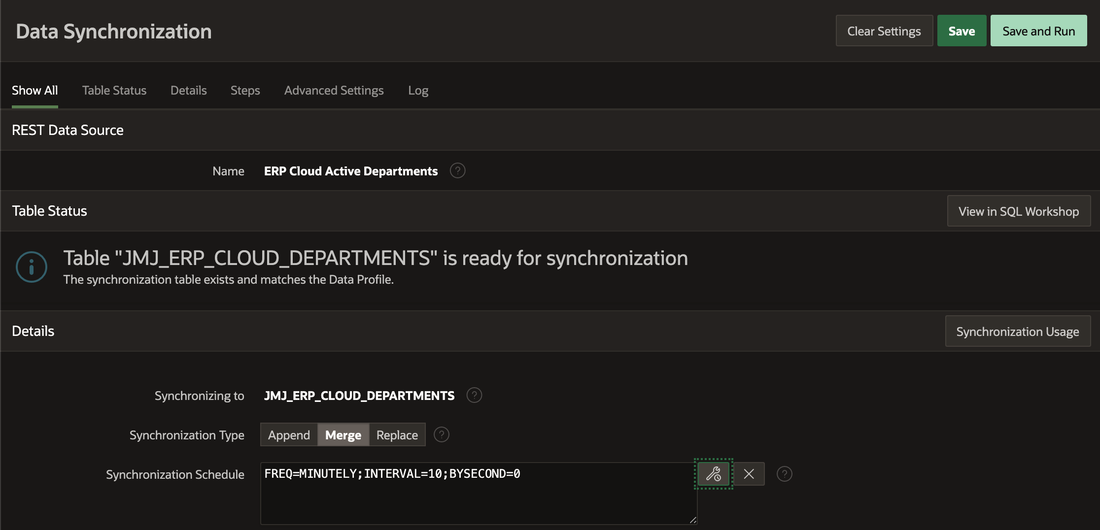
In the next step, we have to choose the Synchronization Type:
​
  • Append - rows are added to the end of the table.
  • Merge - rows are merged using the primary key defined earlier.
  • Replace - the table is truncated (or deleted) before rows are inserted.

The Synchronization Schedule is expressed using same syntax as DBMS_SCHEDULER, so tables can be synchronized every 15 mins, 2 hours, day etc.  
Picture
All done - now we can save the Schedule and we're told when this will run.   

​We can also run it On Demand using the Save and Run button.
Picture
Looking at the new APEX_REST_SOURCE_SYNC package, we should  also be able to start synchronization programmatically using a PL/SQL procedure call.
Picture

3 - Synchronization Results

Once Synchronization has run, the log entries give us rowcounts, message sizes, and execution times.
Picture
Picture
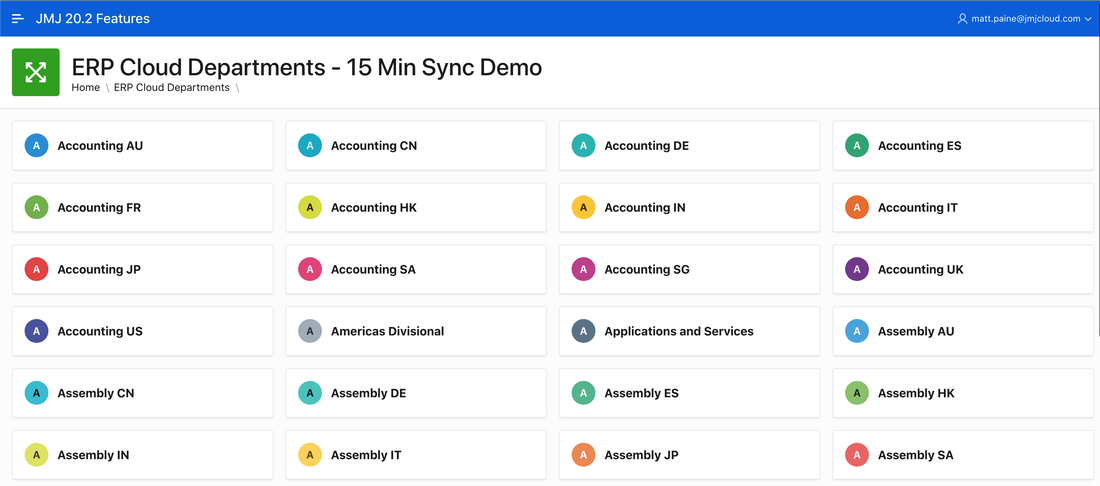
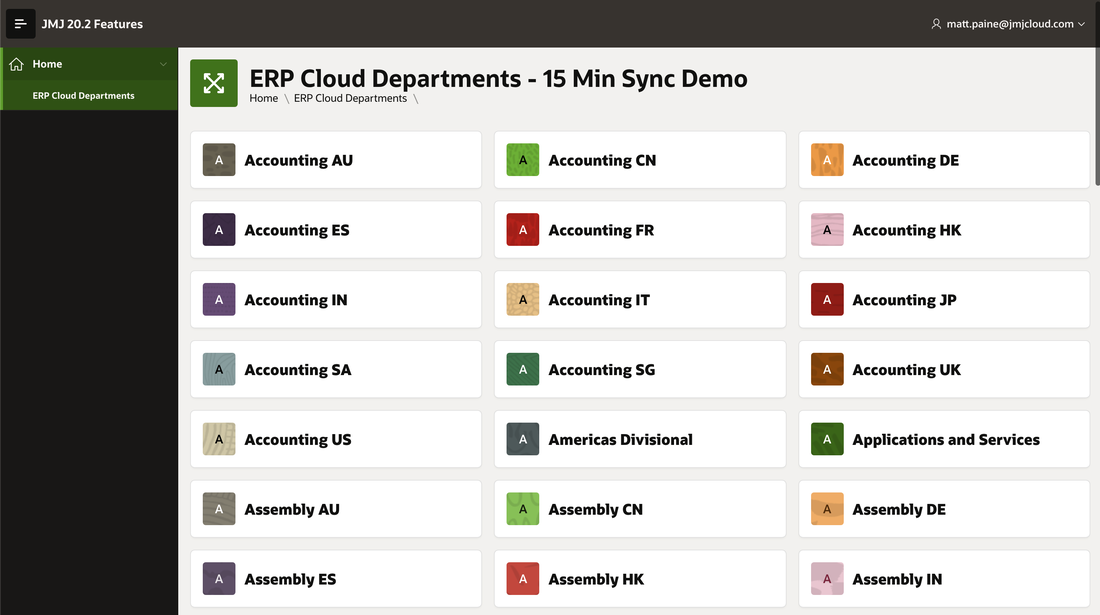
Data is now available in our custom table.   We used the APEX 20.2 Declarative Cards layout to show the data.
Picture
And just for fun, this is what it looks like with the Redwood theme:
Picture
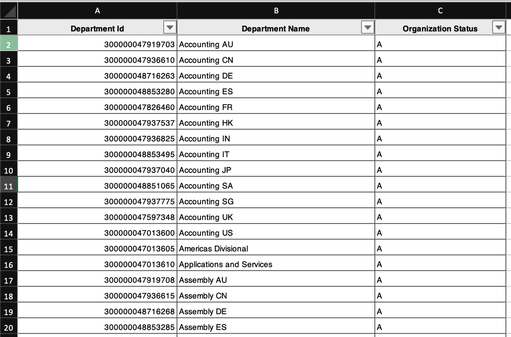
We can also use the new APEX 20.2 Excel downloads to get our newly synchronized data:
Picture
Behind the scenes, the JMJ_ERP_CLOUD_DEPARTMENTS table contains the columns we requested, along with a couple that APEX uses to keep track of synchronization.
Picture

Conclusion

This was our first look at this new feature in APEX 20.2 and in about 15 minutes we were able to create a new workspace, ERP Cloud data source, and synchronize data into a custom table.   

​We didn't have to write a single line of code to call web services, map returned data into tables, or record web service calls and responses.  

This is fantastic functionality, and we look forward it using it in our work using APEX to extend and integrate with ERP Cloud.    We hope ERP Cloud follows the industry and continues to migrate old SOAP services to REST.  This will make integrations like this much simpler and help customers gain the maximum benefit from their ERP Cloud Investment.

This is yet another example of expectations being exceeded by the APEX Development Team!   Thanks to all those who worked hard behind the scenes to make this happen.
0 Comments

Oracle Cloud Infrastructure Events with APEX and ORDS

10/1/2020

0 Comments


Introduction

Oracle Cloud Infrastructure APEX and ORDS
​With the evolution of ERP Cloud and Oracle Cloud Infrastructure (OCI), we are starting to see ERP Cloud utilize OCI features. This is a positive move and it will allow ERP Cloud customers to gain more value from their ERP Cloud investment. One area where we have seen this partnership blossom is with ERP Cloud BI Cloud Connector (BICC) and OCI Object Storage. In this post I will cover how you can leverage more from this integration using OCI Events and Notifications.

​Background

​Oracle BI Cloud Connector (BICC) provides a robust mechanism for performing bulk exports of data from ERP Cloud. Exported CSV files can be directed to Universal Content Management (UCM) (contained within the ERP Cloud environment), or to an OCI Object Storage Bucket. BICC exports are scheduled through the ERP Cloud Enterprise Scheduler Service (ESS). For those of you familiar with e-Business Suite, this is like the Concurrent Manager. So, how do we know when a scheduled job has finished so we can go fetch the file? This is the problem we will address in this post.
 
Although the example below describes a scenario using ERP Cloud, this pattern can be re-used for any scenario where you need to perform an action when a file is created in an OCI bucket, but you don’t know when the file will be created.

OCI Events and Notifications

Oracle Cloud Infrastructure includes two integration tools that can help us with this problem. These are Events and Notifications.
 
Events Service
Events fire when certain things happen on your OCI infrastructure. In our case we want to launch an event whenever a file is created in a specific OCI Object Storage bucket. An event on its own, however, is not very useful. We need the Event to do something and this is where Notifications come in.
 
Notifications Service
A Notification can perform one of the following operations:
  • Email
  • Function (Cloud Based Function e.g. Java)
  • HTTPS (Custom URL)
  • PagerDuty
  • Slack
 
The key notification for us is ‘HTTPS (Custom URL)’. This notification type is further described in section 3 below. When this type of Notification fires, it posts a JSON payload to the HTTPS Endpoint that you define. The content of the payload is specific to the OCI service that causes the Event to fire. In our case, it will contain information about the file that was created.

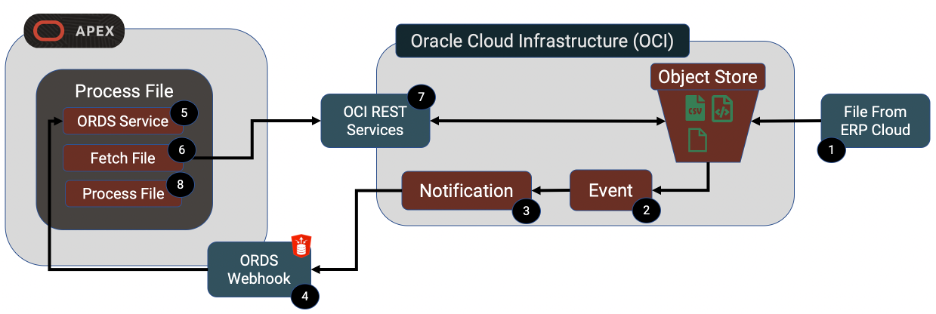
​End to End Process

Now that we have a background on Events and Notifications, we will deep dive into the example process from end-to-end.
Picture
1 - File from ERP Cloud
In our example this file is coming from BI Cloud Connector (BICC) on ERP Cloud. As I mentioned earlier, BICC allows you to perform high volume extracts of data from ERP Cloud to either local Universal Content Manager (UCM) or an OCI Object Store Bucket. We will be using OCI Object store as this gives us more options and easier access to the files once created. BICC allows you to either call a web service to launch an extract job or to use ERP Cloud to schedule the extract. In view of this, files could appear in our OCI Object Store Bucket at any time. We need to know when the file is created so we can go and fetch it.
 
Object Store Bucket
You will need to create an Object Store bucket to receive your file. When creating your Object Store bucket, be sure the ‘Emit Object Events’ option is checked. This is what allows us to subscribe to events on the bucket.
OCI Object Store Bucket Properties
2 - Event
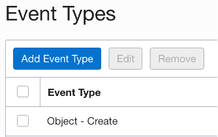
As soon as the file is created in our object store bucket, the event fires. Events consist of an Event Type (this describes the action that should trigger the event) and an Event Action (what you want to happen when the event occurs). In our case the event type is 'Object - Create' and the Event Action is to call a Notification.
Events
OCI Events
3 - Notification
​The Notification is the operation we want to perform when our event fires. We are using the ‘HTTPS (Custom URL)’ operation. Notifications consist of Topics which allow us to categorize our notifications. For each Topic, we can create multiple Subscriptions. This allows us to let multiple systems know when an Event occurs. In this example, we are referencing our ORDS Endpoint.

If your ORDS end point is unavailable when it is called by the Notification, OCI will re-try to post to your service for a period of up to 2 hours.
Picture
​The Endpoint service needs to have a POST handler to accept the payload from the Notification. In our case, our Endpoint is an ORDS REST service running on an APEX environment (see step 4 for details).

When you first create a notification, it will go into a status of ‘Pending confirmation’.
Picture
At the time you create the Notification, OCI sends a payload to your Endpoint containing a confirmation URL. The confirmation step ensures that you have control over the Endpoint that you define in your Notification.

    
Grab the URL and open it on your browser. One you have done this; your Notification is ready to go. Going forward, whenever a file is uploaded to your Object Storage bucket, OCI will post a JSON file to your Endpoint. For object store events, the payload looks like this:

    
4 – ORDS Service
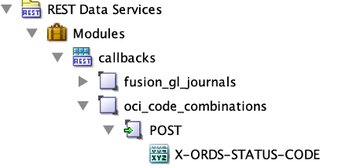
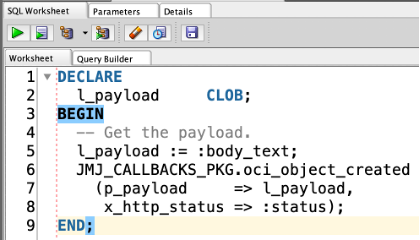
The ORDS web service definition is pretty simple. Here is a screen shot (from SQLDeveloper) of the Module, Template and Handler for a service that can receive a payload from an OCI Notification.
Picture
Picture
The PL/SQL code you add to the handler can do anything you want. In our case it submits a Database Scheduler Job to fetch and process the file asynchronously.
 
5 – Process File
In our DB Scheduler Job, we use the OCI Object Store REST services to fetch the file from the OCI Object Store bucket. This connectivity between APEX and OCI was made much easier in APEX 19.2 when Web Credentials were enhanced to include the ‘Oracle Cloud Infrastructure (OCI)’ Authentication Type. This allows us to configure a native Web Credential for connecting to OCI Web Services. I recommend this Oracle A-Team Blog which describes in detail the OCI and APEX setups that are required to get this integration working.
 
After you have fetched the file (using APEX_WEB_SERVICE), you can then parse it (using APEX_DATA_PARSER) and process it as necessary, making the data available for your APEX Applications.

Conclusion

​I have been using APEX and ORDS on Amazon Web Services (AWS) for a number of years and until recently, I was not sure Oracle was ever going to compete. Oracle Cloud Infrastructure has come a long way in the past 12 months. While it still falls far short of AWS in terms of functionality, the functionality that is there is intuitive and works well. If you add great initiatives like ‘Always Free’ ATP, ORDS and APEX then you have a platform that is worth getting to know..
 
As APEX/ORDS developers and architects I encourage you to explore OCI. I also think we should start  to think differently about how we build our APEX solutions to utilize OCI where it makes sense. 

Author

Jon Dixon. Co-Founder JMJ Cloud

0 Comments

    RSS Feed

    Popular Posts

    - APEX Dog Food
    - Cloud ERP & APEX Mashup
    - Modernizing EBS with APEX
    - Easy APEX_WEB_SERVICE
    - Running APEX in RDS
    - ORDS What & Why?

    Categories

    All
    APEX
    AWS
    Fusion Cloud ERP
    INTEGRATION
    OCI
    ORDS
    PaaS
    RAD
    REST
    SOAP

    Archives

    January 2021
    October 2020
    September 2020
    June 2020
    May 2020
    April 2020
    February 2020
    January 2020
    October 2019
    September 2019
    August 2019
    July 2019
    June 2019
    April 2019
    March 2019
    February 2019
    January 2019
    December 2018
    November 2018
    October 2018
    September 2018
    August 2018
    July 2018
    June 2018
    May 2018
    April 2018
    March 2018
    February 2018
    January 2018
    September 2017
    August 2017
    July 2017
    June 2017
    February 2017
    January 2017
    December 2016
    November 2016
    October 2016
    September 2016
    August 2016
    July 2016

Company

About
Contact
Blog
  • Home
  • Projects
  • Blog
  • About Us
  • Contact Us