JMJ CLOUD
  • Home
  • Projects
  • Blog
  • About Us
  • Contact Us

Our Blog

Integrating APEX & ORDS with Microsoft Teams Messaging

2/4/2021

0 Comments


Introduction

Integrating APEX & ORDS with MS Teams
The use of Microsoft Teams grew exponentially in 2020. Thanks to Inbound and Outbound Webhook functionality in Teams and the killer combination of Oracle APEX and Oracle Rest Data Services (ORDS), it is easier than ever to incorporate Teams messaging into your APEX Applications. In this post, I will describe how you can send feature rich messages to users in Teams from your APEX Apps and how you can create simple Chatbots using Teams which can interact with your APEX Apps using ORDS.

Background

Teams allows you to bring together people from around your organization into permanent or Ad-Hoc teams for increased collaboration. It also combines with other Office 365 services like Calendar and SharePoint to further enhance collaboration. None of the Teams integrations I am going to describe utilize MS Graph APIs in any way. You don’t even need to create an Active Directory ‘App registration’. Instead, communication between Teams and your APEX application is handled using Inbound and Outbound Webhooks.
 
Teams Terminology (Teams and Channels)
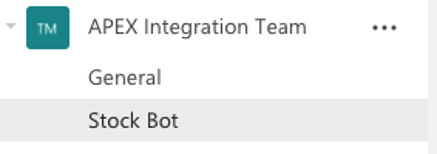
The screen shot below shows a team called ‘APEX Integration Team’ which has two Channels ‘General’ and ‘Stock Bot’. Channels allow you to break out communication within a team between different subjects.
Picture

Outbound Webhooks

Outbound webhooks allow you to create a simple Chatbot for a Team. In Teams, you configure the URL you want Teams to call when the Webhook is invoked. In our case, this URL will be an ORDS web service (more on that later). Whenever a user @mentions the Webhook from within a Channel, Teams sends a JSON payload to the URL endpoint specified in the Outbound Webhook definition. The JSON payload contains details of the user who invoked the Webhook, the conversation ID, the channel and of course the text that was entered by the user.
 
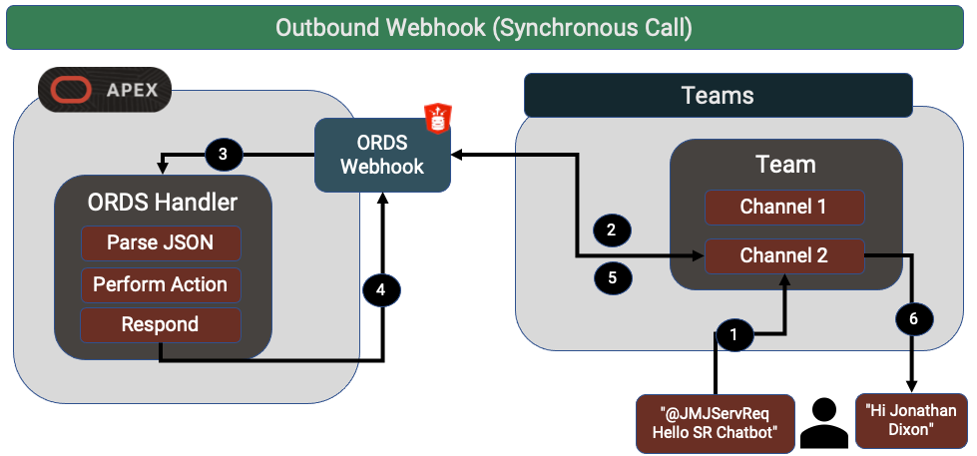
The diagram below shows the flow of information from the point the user sends a message to the Outbound Webhook (step 1) up to the point where the response from the ORDS Service is displayed to the user in Teams (step 6).
Outbound Webhook Flowchart
​In our case we are using ORDS to create an endpoint by creating a Module, Template and POST Handler. The PL/SQL code in the POST handler is responsible for parsing the JSON sent by Teams, running PL/SQL code to perform the action requested by the user, and then responding with a reply in the REST service response. Teams calls your endpoint synchronously and gives you 5 seconds to complete your response. Teams then takes your response and displays it to the user in the Teams client application.
 

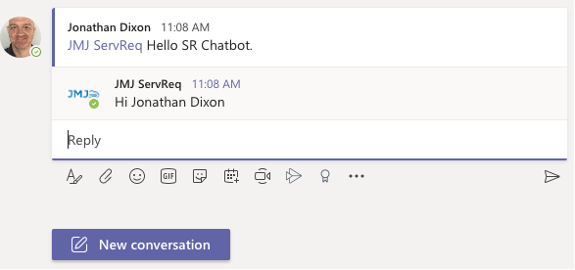
Here is a screen shot of an example interaction. The User @mentioned an outbound Webhook called ‘JMJ ServReq’ and sent the message ‘Hello SR Chatbot’.
Picture
The ORDS Webhook was called by Teams, our PL/SQL code parsed the JSON sent by Teams and pulled out the user’s name. Finally, the PL/SQL generated a JSON response which included the user’s name.
 
Example Use Cases
  • Get information from Oracle EBS or ERP Cloud. A user types “@ebs How much of item XYZ is left in stock” into a Teams channel created for a particular warehouse. Your ORDS end point would then get the on-hand inventory for the item in that warehouse and responds to the user with the quantity.
  • Perform actions in EBS or ERP Cloud. A user types “@erpcloud cancel order #102202” into a Teams channel. Your ORDS service checks if the order is open and replies, “Are you sure?” you then respond “@erpcloud Yes”. Your ORDS service recognizes it is the same conversation and you have confirmed cancellation and proceeds to cancel the order using ERP Cloud Web Servcies. Note: Because Teams keep track of a “conversation” you can respond to the user asking them questions about their inquiry (just like a chatbot does).
 
Security
When a user messages your Webhook, you can assume they have been authenticated by Microsoft. You cannot, however, assume they are authorized to use your chatbot. You should include your own code to verify that the user which sends the message is allowed to use the Chatbot. In addition, to ensure that your service is receiving calls only from actual Teams clients, Teams provides an HMAC Code in the HTTP ‘hmac’ header.
 
Teams Setup
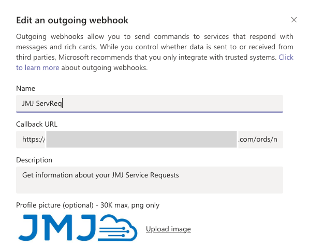
Here is a screen shot showing the setup of the Outbound Webhook in Teams. It is as simple as providing the URL for your ORDS Endpoint.
Picture
​ORDS POST Handler Setup
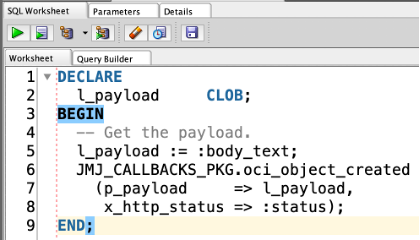
In our very simple example, the ORDS handler PL/SQL code looks like the below code block. In real life, you are going to need additional code to validate the sender is Teams, determine if the user is authorized to perform the required action in your system, and build a JSON document to respond to the user.


Inbound Webhooks

Inbound Webhooks are a special type of Connector in Teams that provide a simple way for an external app to share content in Teams. Teams provides a unique URL to which you POST a JSON payload with details of the message. The timing of when the message is posted is completely up to you so it can be based on an event that occurs in your application.
Picture
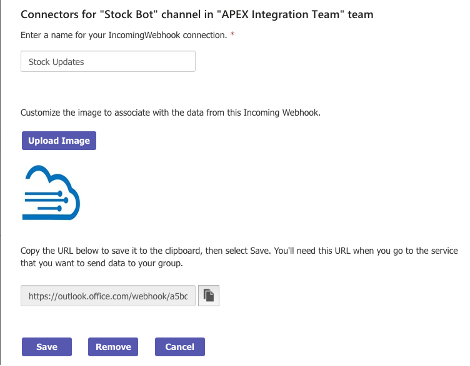
Teams Setup Incoming Webhook Connector
​The URL generated when you create the connector is the URL you will POST messages to. These messages will then show up in the channel which you created the connector in.
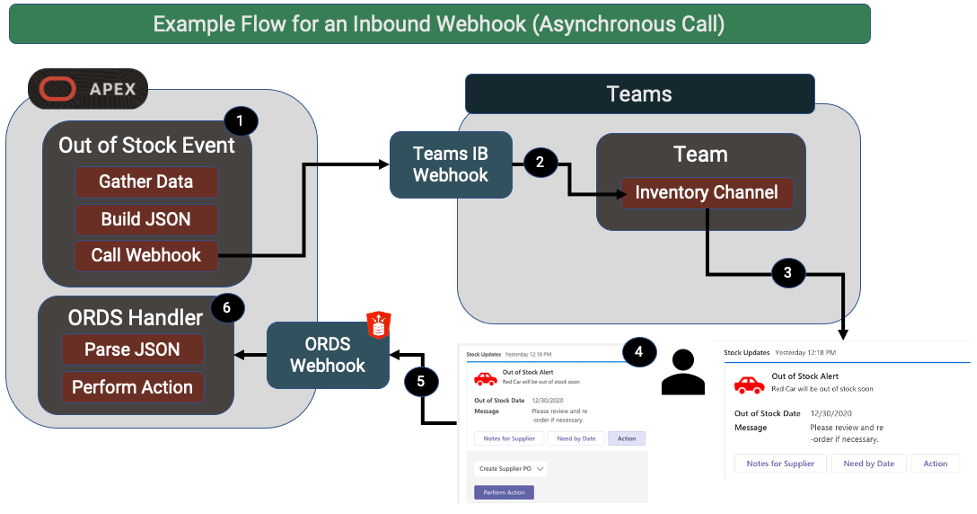
Inbound Webhook Flowchart
​Message Formatting Options
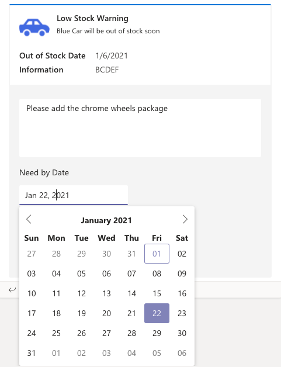
There are several options for formatting the messages you send to Teams. The most flexible is to use Cards. Cards provide the ability for users to respond to the message using multiple input options like free form text, date pickers and select lists. The layout of the card and the actions a user can perform on the card are all defined in the JSON payload you send to Teams (step 1 in flow diagram above).
​Actionable Message Cards Vs Adaptive Cards
It seems that Microsoft is in the middle of transitioning their cards interface from legacy Actionable Message Cards to Adaptive Cards. At the time of writing this post, Adaptive Cards do not allow you to post a user’s response to a card to your own http endpoint (see step 4 and 5 in the flow diagram above). In view of this, if you need a response to the card in Teams then for now you must use Actionable Message Cards. If you do not need a response then I recommend using Adaptive cards, as these are surely the future. From here on in, I will simply use the term ‘Cards’.
 
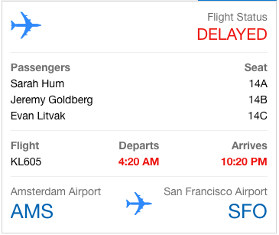
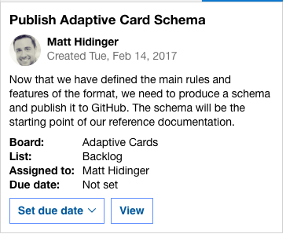
For design ideas, check out the Adaptive Card Samples which provide several sample card layouts and the Designer, which allows you to enter your own JSON and see what your cards will look like. You can find sample Actionable Message Cards here.
 
Other Card Features
The power of cards in the Microsoft ecosystem does not stop there. For example, you can send cards in emails and make them part of your approvals workflow using Power Automate. When a user responds to a card you can have your API send back a new card with refreshed information based on the users response. You can even pro-actively send updated information to a card that you already sent to prevent the data from becoming stale. 
 
Example Inbound Webhook Use Case with User Response Via Card
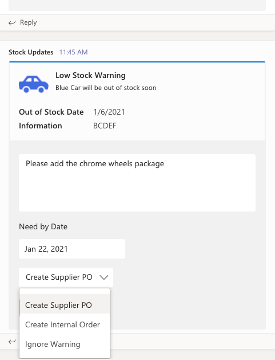
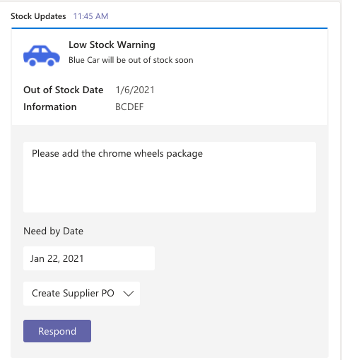
Inventory Level Monitor. Let’s say you wanted to inform management whenever on-hand inventory in Oracle e-Business Suite (EBS) for a product went below a certain level. You can create an ‘Incoming Webhook Connector’ and attach it to a channel within your Purchasing Team. In EBS we could create a Concurrent Program which runs intermittently and posts a JSON payload to the Webhook whenever a product’s inventory drops below a certain level. The post is performed by calling the APEX_WEB_SERVICE PL/SQL API. Here is an example of a card that appears in a Teams Channel when the Inbound Webhook is invoked.
In the JSON message we send to the Webhook (see sample below), we included details about the card such as the title, sub-title, custom entry fields, the icon to display and an action button for the user to respond with. When the users enter notes, the need by date and clicks ‘Respond’, their responses are posted back to an ORDS POST web service that we created. In this example, Your ORDS web service could then create a PO in Oracle EBS.
 
Example JSON payload for an Actionable Message Card
This is an example payload posted to an Inbound Webhook Connector URL. It is the exact JSON used to create the card examples above. It contains details of the card to show the user in Teams in addition to the ORDS service to POST user responses to.

    
​Rate Limits
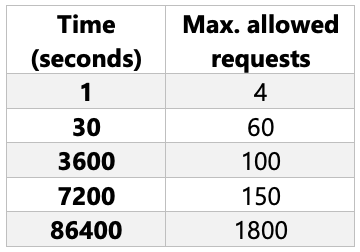
As with many MS services, there are rate limits for Connectors. At time of writing this post they are as follows. If you exceed these limits, you could start getting http ‘429’ errors.
Picture

Conclusion

I have barely scratched the surface with what is possible with Inbound and Outbound messaging between APEX/ORDS and MS Teams. The combined power of APEX & ORDS combined with the Office 365 ecosystem is a powerful combination which cannot be ignored (especially in a corporate setting). I encourage you to dig deeper and incorporate Office 365 into your APEX Application wherever it makes sense.

Author

Jon Dixon Co-Founder JMJ Cloud
0 Comments

Oracle Cloud Infrastructure Events with APEX and ORDS

10/1/2020

0 Comments


Introduction

Oracle Cloud Infrastructure APEX and ORDS
​With the evolution of ERP Cloud and Oracle Cloud Infrastructure (OCI), we are starting to see ERP Cloud utilize OCI features. This is a positive move and it will allow ERP Cloud customers to gain more value from their ERP Cloud investment. One area where we have seen this partnership blossom is with ERP Cloud BI Cloud Connector (BICC) and OCI Object Storage. In this post I will cover how you can leverage more from this integration using OCI Events and Notifications.

​Background

​Oracle BI Cloud Connector (BICC) provides a robust mechanism for performing bulk exports of data from ERP Cloud. Exported CSV files can be directed to Universal Content Management (UCM) (contained within the ERP Cloud environment), or to an OCI Object Storage Bucket. BICC exports are scheduled through the ERP Cloud Enterprise Scheduler Service (ESS). For those of you familiar with e-Business Suite, this is like the Concurrent Manager. So, how do we know when a scheduled job has finished so we can go fetch the file? This is the problem we will address in this post.
 
Although the example below describes a scenario using ERP Cloud, this pattern can be re-used for any scenario where you need to perform an action when a file is created in an OCI bucket, but you don’t know when the file will be created.

OCI Events and Notifications

Oracle Cloud Infrastructure includes two integration tools that can help us with this problem. These are Events and Notifications.
 
Events Service
Events fire when certain things happen on your OCI infrastructure. In our case we want to launch an event whenever a file is created in a specific OCI Object Storage bucket. An event on its own, however, is not very useful. We need the Event to do something and this is where Notifications come in.
 
Notifications Service
A Notification can perform one of the following operations:
  • Email
  • Function (Cloud Based Function e.g. Java)
  • HTTPS (Custom URL)
  • PagerDuty
  • Slack
 
The key notification for us is ‘HTTPS (Custom URL)’. This notification type is further described in section 3 below. When this type of Notification fires, it posts a JSON payload to the HTTPS Endpoint that you define. The content of the payload is specific to the OCI service that causes the Event to fire. In our case, it will contain information about the file that was created.

​End to End Process

Now that we have a background on Events and Notifications, we will deep dive into the example process from end-to-end.
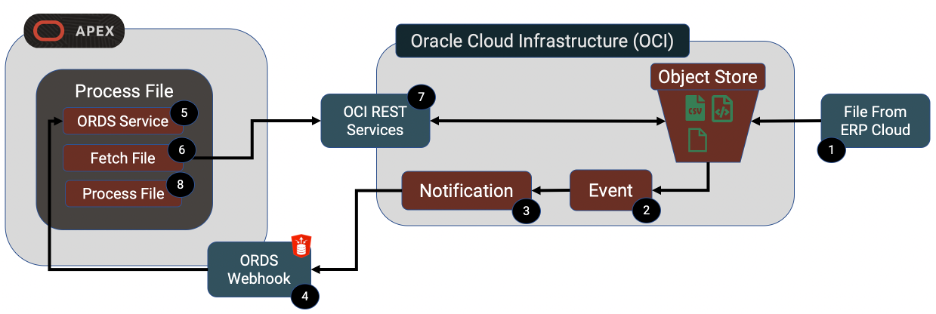
Picture
1 - File from ERP Cloud
In our example this file is coming from BI Cloud Connector (BICC) on ERP Cloud. As I mentioned earlier, BICC allows you to perform high volume extracts of data from ERP Cloud to either local Universal Content Manager (UCM) or an OCI Object Store Bucket. We will be using OCI Object store as this gives us more options and easier access to the files once created. BICC allows you to either call a web service to launch an extract job or to use ERP Cloud to schedule the extract. In view of this, files could appear in our OCI Object Store Bucket at any time. We need to know when the file is created so we can go and fetch it.
 
Object Store Bucket
You will need to create an Object Store bucket to receive your file. When creating your Object Store bucket, be sure the ‘Emit Object Events’ option is checked. This is what allows us to subscribe to events on the bucket.
OCI Object Store Bucket Properties
2 - Event
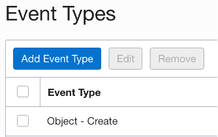
As soon as the file is created in our object store bucket, the event fires. Events consist of an Event Type (this describes the action that should trigger the event) and an Event Action (what you want to happen when the event occurs). In our case the event type is 'Object - Create' and the Event Action is to call a Notification.
Events
OCI Events
3 - Notification
​The Notification is the operation we want to perform when our event fires. We are using the ‘HTTPS (Custom URL)’ operation. Notifications consist of Topics which allow us to categorize our notifications. For each Topic, we can create multiple Subscriptions. This allows us to let multiple systems know when an Event occurs. In this example, we are referencing our ORDS Endpoint.

If your ORDS end point is unavailable when it is called by the Notification, OCI will re-try to post to your service for a period of up to 2 hours.
Picture
​The Endpoint service needs to have a POST handler to accept the payload from the Notification. In our case, our Endpoint is an ORDS REST service running on an APEX environment (see step 4 for details).

When you first create a notification, it will go into a status of ‘Pending confirmation’.
Picture
At the time you create the Notification, OCI sends a payload to your Endpoint containing a confirmation URL. The confirmation step ensures that you have control over the Endpoint that you define in your Notification.

    
Grab the URL and open it on your browser. One you have done this; your Notification is ready to go. Going forward, whenever a file is uploaded to your Object Storage bucket, OCI will post a JSON file to your Endpoint. For object store events, the payload looks like this:

    
4 – ORDS Service
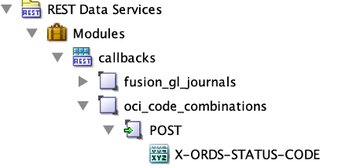
The ORDS web service definition is pretty simple. Here is a screen shot (from SQLDeveloper) of the Module, Template and Handler for a service that can receive a payload from an OCI Notification.
Picture
Picture
The PL/SQL code you add to the handler can do anything you want. In our case it submits a Database Scheduler Job to fetch and process the file asynchronously.
 
5 – Process File
In our DB Scheduler Job, we use the OCI Object Store REST services to fetch the file from the OCI Object Store bucket. This connectivity between APEX and OCI was made much easier in APEX 19.2 when Web Credentials were enhanced to include the ‘Oracle Cloud Infrastructure (OCI)’ Authentication Type. This allows us to configure a native Web Credential for connecting to OCI Web Services. I recommend this Oracle A-Team Blog which describes in detail the OCI and APEX setups that are required to get this integration working.
 
After you have fetched the file (using APEX_WEB_SERVICE), you can then parse it (using APEX_DATA_PARSER) and process it as necessary, making the data available for your APEX Applications.

Conclusion

​I have been using APEX and ORDS on Amazon Web Services (AWS) for a number of years and until recently, I was not sure Oracle was ever going to compete. Oracle Cloud Infrastructure has come a long way in the past 12 months. While it still falls far short of AWS in terms of functionality, the functionality that is there is intuitive and works well. If you add great initiatives like ‘Always Free’ ATP, ORDS and APEX then you have a platform that is worth getting to know..
 
As APEX/ORDS developers and architects I encourage you to explore OCI. I also think we should start  to think differently about how we build our APEX solutions to utilize OCI where it makes sense. 

Author

Jon Dixon. Co-Founder JMJ Cloud

0 Comments

Simplifying APEX_WEB_SERVICE & OAuth2 Client Credentials

10/30/2019

0 Comments


Introduction

Simplifying APEX_WEB_SERVICE and OAuth2
​Since APEX 18.1, there has been a new way to call OAuth2 Client Credentials secured web services using APEX_WEB_SERVICE. This new method alleviates the need for developers to store OAuth2 credentials, manage token expiration and also has potential performance benefits. In this post I will describe the new approach and its benefits.

​Background on OAuth2 Client Credentials 

In the OAuth2 client credentials flow you must first call a token web service, passing a client ID and client secret. If these credentials are valid, the token service will then pass back a token. The token can then be used to call certain secured web services covered by the token. The token returned by an OAuth2 client credentials service looks something like the below.


Stuck in my Ways

I must confess that I can get stuck in my ways. It often takes a weekend and a few hours buried in the APEX API guide for me to get caught up with the latest and greatest. Case in point, I have been using APEX_WEB_SERVICE for several years and most of my code to call web services secured by Ouath2 Client Credentials looks like this:
  1. Fetch token service URL, Client ID and Client Secret from a custom table.
  2. Call the OAuth token service to get token using APEX_WEB_SERVICE.
  3. Optionally store the token for use again (within its expiration window).
  4. Call the main web service using APEX_WEB_SERVICE, passing the token.
  5. Repeat as many times as the user calls the web service.
 
Don’t get me wrong, this is still much more convenient than using UTL_HTTP. As a developer, however, I am still having to manage the following:
  1. Storing the token end point and the client credentials (most likely not very securely).
  2. Deciding when the token expires and fetching another token (more likely not bothering to do this and just getting a new token every time I call the main web service).

Drawbacks

Of course, there are drawback to this.
 
Storing the Credentials
​
I have to build an APEX page to store the token URL and credentials and also some APIs to set and get these values. I then have to build APIs to manage token expiration and decide when to get a new token. Finally, I have to maintain this code and nurse it through upgrades etc. All this was fun the first time but I would much rather have APEX handle this for me so I can focus on delivering business logic.
 
Securing the Credentials
This approach also introduces the obvious security concern which is that I may not be encrypting the credentials when I store them.
 
Performance
Unless you build code to store the expiration time for the token, you are most likely going to call the token service every time you call the main web service. While token services are usually pretty light weight, you are incurring an extra round trip from your database to the endpoint every time you call the main web service. This can add up to a second to every web service call which is noticeable to your end users.

There is a Better Way

Ever since the APEX development team introduced APEX 18.1 you could sense a shift toward making it easier for developers to talk to the outside world using APEX. This all hinges around the APEX_EXEC package and the drive toward making every APEX component equally as happy sourcing it’s data from a web service as it is from a SQL statement on the local database.
 
Since APEX 18.1 we can make calls to APEX_WEB_SERVICE without having to deal with first calling the associated token service or having to manage token expiration. This is made possible with the addition of 2 parameters p_credential_static_id and p_token_url. These parameters allow you to pass a reference to a set of ‘Web Credentials’ and the token URL to APEX_WEB_SERVICE and it will handle the REST (pun intended).
 
APEX_EXEC For all use cases that fit, I strongly encourage you to look into APEX_EXEC, instead of APEX_WEB_SERVICE. APEX_EXEC takes even more of the load off the developer and has a number of other advantages which I don’t have time to get into in this post. Carsten Czarski wrote a great overview in this post.

Example

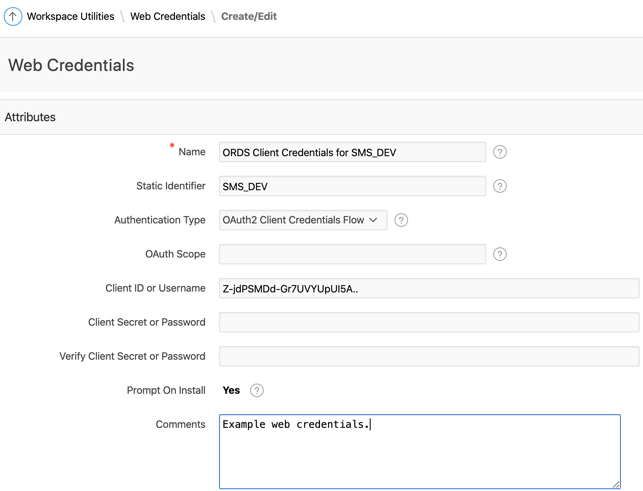
​As always, examples speak a thousand words. Before we can reference a set of Web Credentials in our code, we need to define them in APEX. Web Credentials are stored at the Workspace level. Once logged into your APEX Workspace, navigate to App Builder > Workspace Utilities > All Workspace Utilities > Web Credentials.
 
In addition to creating and editing Web Credentials in the APEX UI, you can also set them programmatically using the APEX_CREDENTIAL API (available since APEX 18.2). This API has a number of uses, one of which is to help when migrating new credentials to TEST and PROD instances.
Picture
​Note: When you edit Web Credentials APEX does not show you the client secret. It is there, you just can’t see them (for security reasons).

    
Highlights from the above code:
  1. In order to use APEX_WEB_SERVICE (with web credentials) you need to have an APEX session.
  2. Here I am setting variables for the URL of the web service I want to call as well as the URL of the token web service. Ideally these would be stored in a table. For bonus points, you could store the base URL in a ‘Remote Server’ definition (also stored at the workspace level). You can then use the APEX view apex_workspace_remote_servers to fetch the base URL for the web service and tag on the path for the token service and the main web service.
  3. Call the web service. The final two parameters are of particular importance and are essentially what this blog is all about.
    • p_credential_static_id is pointing to the Web Credential ‘SMS_DEV’ that I have setup in my workspace (see screen shot above).
    • p_token_url is pointing to the URL of the token service for the web service referenced by l_rest_url.
  4. Check the return status of the call and parse the JSON response.

How did this Help Me?

I now want to look back on the three drawbacks from the old five steps approach and see how the two extra parameters above have helped me. The main benefit of course is that we now have just two steps instead of the 5 steps in the original approach:
  1. Call the main web service using APEX_WEB_SERVICE, passing Web Credentials Static ID and Token Web Service URL.
  2. Repeat as many times as the user calls the web service (APEX handles fetching new tokens etc.).
 
Storing the Credentials
The OAuth2 Client Credentials can now be stored natively in APEX using ‘Web Credentials’. APEX provides a UI to manage these credentials and APIs to set these credentials programmatically.
 
Securing the Credentials
Using Web Credentials, even the Workspace Administrator is not able to view the client secret for a given client. In addition, although there are APIs to set the credentials there are none to get credentials. The only way to use them is via APEX APIs.
 
Performance
​
When you pass values for p_credential_static_id and p_token_url you are essentially handing over management of the OAuth2 token to APEX. It will store the expiration for the token, and it will only get a new token when it needs to.
 
All this leaves you as a developer to focus on calling the main web service and parsing the results.

Conclusion

​The APEX development team continues to make it easier for APEX developers to work with REST based web services. This makes it easier and easier for developers to use cloud-based services like SMS, Address Verification, Machine Learning, Object Storage etc. etc. Having easy access to these cloud services allows developers to provide game changing features in their APEX apps.
 
Enhancement Request: It would be great if instead of having to pass p_token_url, we could pass the static id of the remote server plus a suffix for the token service end point. This would prevent us from having to store the URL of the token service in a custom table. Remote Servers are defined under ‘Remote Servers’ in the Workspace Utilities area (right above Web Credentials).

Author

Jon Dixon, Co-Founder JMJ Cloud

0 Comments
<<Previous

    RSS Feed

    Popular Posts

    - APEX Dog Food
    - Cloud ERP & APEX Mashup
    - Modernizing EBS with APEX
    - Easy APEX_WEB_SERVICE
    - Running APEX in RDS
    - ORDS What & Why?

    Categories

    All
    APEX
    AWS
    Fusion Cloud ERP
    INTEGRATION
    MS GRAPH
    OCI
    ORDS
    PaaS
    RAD
    REST
    SOAP

    Archives

    October 2021
    February 2021
    January 2021
    October 2020
    September 2020
    June 2020
    May 2020
    April 2020
    February 2020
    January 2020
    October 2019
    September 2019
    August 2019
    July 2019
    June 2019
    April 2019
    March 2019
    February 2019
    January 2019
    December 2018
    November 2018
    October 2018
    September 2018
    August 2018
    July 2018
    June 2018
    May 2018
    April 2018
    March 2018
    February 2018
    January 2018
    September 2017
    August 2017
    July 2017
    June 2017
    February 2017
    January 2017
    December 2016
    November 2016
    October 2016
    September 2016
    August 2016
    July 2016

Company

About
Contact
Blog
  • Home
  • Projects
  • Blog
  • About Us
  • Contact Us