
Introduction
I have worked with several customers who are struggling to understand how they can extend the UI in Oracle Fusion Apps or Cloud ERP. Tools like OTBI offer options for representing data that is already in the Cloud ERP environment (namely dashboards, infolets and charts). It does not, however, allow you to incorporate mashups of data with other systems.
The solution to this is PaaS. Using Oracle's PaaS offerings, you can embed a custom UI within your Cloud ERP application without your user having to navigate out of Cloud ERP or re-authenticate. Oracle's PaaS solutions, however, are expensive and harder for the traditional Oracle Applications community to understand. We require, therefore, a gateway drug that we can buy cheaply, that we already use and will get us hooked on other PaaS solutions. Enter APEX on the Oracle Exadata Express Service, the Oracle Database Schema Cloud Service or even your own APEX environment (if it is externalized to the internet and running over https).
In this post, I will take you through the basic steps to integrate a simple APEX Report in a new page in Cloud ERP. Do not be fooled by the simplicity of this example, the potential is much farther reaching. This approach opens the door to many other possibilities, including but certainly not limited to:
At this stage, I should say the example I am going to outline below is not fully comprehensive. There are a few areas where I would tighten up security (e.g. creating an authentication scheme in APEX) and some steps that were taken for expediency that I might do differently if it were a production application.
The solution to this is PaaS. Using Oracle's PaaS offerings, you can embed a custom UI within your Cloud ERP application without your user having to navigate out of Cloud ERP or re-authenticate. Oracle's PaaS solutions, however, are expensive and harder for the traditional Oracle Applications community to understand. We require, therefore, a gateway drug that we can buy cheaply, that we already use and will get us hooked on other PaaS solutions. Enter APEX on the Oracle Exadata Express Service, the Oracle Database Schema Cloud Service or even your own APEX environment (if it is externalized to the internet and running over https).
In this post, I will take you through the basic steps to integrate a simple APEX Report in a new page in Cloud ERP. Do not be fooled by the simplicity of this example, the potential is much farther reaching. This approach opens the door to many other possibilities, including but certainly not limited to:
- An APEX report in an Cloud ERP tab, showing Salesforce data in real time (Via a Web Service call from APEX to Salesforce)
- An APEX data entry form in an Cloud ERP tab that allows users to enter data and post it to other systems via web services in APEX (e.g. Salesforce, Concur, on-premise legacy systems etc.)
- An APEX data entry form in an Cloud ERP tab that displays departmental data from the APEX database mashed up with Cloud ERP data. In this scenario APEX pulls data from Cloud ERP and its local database to present a mashup to the user.
At this stage, I should say the example I am going to outline below is not fully comprehensive. There are a few areas where I would tighten up security (e.g. creating an authentication scheme in APEX) and some steps that were taken for expediency that I might do differently if it were a production application.
A Teaser Before We get Started
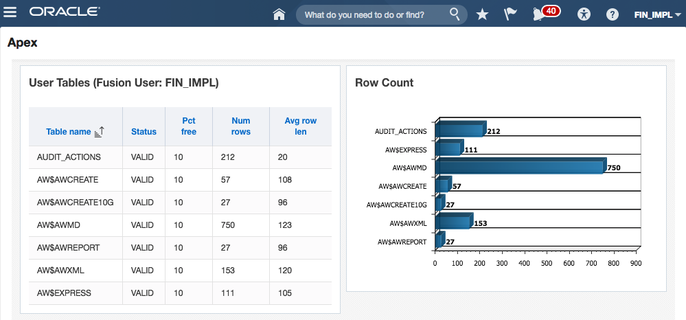
The finished product
Preparing APEX
There are a few things you need to take care of on the APEX side to make this work seamlessly.
- Use the Vista theme, this is the Alta UI used in today's Oracle Cloud Products and fits very well with the Cloud ERP look and feel.
- Create a Custom Page Template. I took a copy of the standard template 'Minimal - No Navigation' and removed the following items from the new template:
- Remove <div class="t-Header-branding"> and all the div's between it from the Header.
- Remove: #APP_VERSION#, #CUSTOMIZE#, #SCREEN_READER_TOGGLE# from the Body.
- This removes the APEX header, Nav Bar etc. from all our pages. Remember, our pages will be running in a tab within Cloud ERP so we don't need the extra stuff.
- The mashup will be running in an iframe. To make this work, we need to change an APEX security setting > Edit Application Properties > Security > Browser Security > Embed in Frames = Allow.
- If you are running on your own server, you will need to import the Oracle Cloud ERP ssl certificate into your database wallet so you can do a call back to Cloud ERP REST and SOAP web services from APEX.
Creating a Demo APEX Page
Now that we have the basics in place, we can create our demo APEX page. Create a new page (page 10) with the following attributes:
- Page Authentication: Page is Public
- Note: This is an example of something we do in a demo only. In reality, we would create an authentication scheme.
- Create a Before Header page processes (more on this below):
- Name: Parse JWT and Get Username
- Create a region of type 'Classic Report', enter a SQL query just to get some data returned (e.g. SELECT table_name, status, pct_free, num_rows, avg_row_len FROM all_tables WHERE TABLE_NAME LIKE 'A%').
- Create a chart region based on the same query.
- Create the following Page Items:
- P10_JWT (hidden, value protected = No). This page item will accept the Java Web Token (JWT) from Cloud ERP.
- P10_JWT_BASE (hidden, value protected = Yes, Session State 'Restricted - may not be set from the browser').
- P10_FUSION_USER (Display Only, Session State 'Restricted - may not be set from the browser')
JWT?
Before I go too much further I should explain where the Java Web Token (JWT) fits in. I will explain how to generate one from Cloud ERP later in the post. The JWT is essentially a token that is generated by Cloud ERP uniquely for your session. The JWT will be passed to APEX in the Query String. The JWT is composed of 3 '.' delimited segments. The first segment is the JWT header, the middle is the actual payload, and the last section is the HMAC256 encoded signature. Each segment is Base 64 encoded.
Here is an example of the middle segment (base 64 encoded):
eyJleHAiOjE0Nzg4MzE1MDAsImlzcyI6Ind3dy5vcmFjbGUuY29tIiwicHJuIjoiRklOX0lNUEwiLCJpYXQiOjE0Nzg4MTcxMDB9
Which un-encoded, looks like this:
{"exp":1478831500,"iss":"www.oracle.com","prn":"FIN_IMPL","iat":1478817100}
It contains the expiration, in Epoch/Unix time format (exp) and the user name (prn). We can use this user name to set context in APEX. But that's not all, the entire JWT can also be used to authenticate web service calls back to Cloud ERP (more on that later).
The Page Process (Parse JWT and Get Username)
The page process is going to take care of accepting and decoding the JWT. I have include some code snippets which will be useful when building your own.
Get the JWT from the URL Query String:
l_query_string := owa_util.get_cgi_env('QUERY_STRING');
When Cloud ERP calls APEX, it will pass the token as ?jwt=<token> so we have to remove the 'jwt=':
l_jwt_start_pos := INSTR(l_query_string,'jwt=')+4;
:P10_JWT_BASE := SUBSTR(l_query_string, l_jwt_start_pos, 10000);
To get the payload from the middle segment of the JWT, we can convert the JWT to a PL/SQL Array:
l_jwt_arr := APEX_UTIL.STRING_TO_TABLE(:P10_JWT_BASE, '.');
The payload is in the 2nd row of the array. Finally, we need to un-encode and then the parse the JSON to get the (prn) or username:
l_prn_json := UTL_ENCODE.TEXT_DECODE(l_jwt_arr(2), 'UTF8', UTL_ENCODE.BASE64);
APEX_JSON.PARSE (l_prn_json);
:P10_FUSION_USER := APEX_JSON.get_varchar2 (p_path => 'prn');
Making Sure the JWT is Authentic
At this stage we know the Fusion Username but we could have fabricated a JWT to get us this far. We should make a call back to Cloud ERP, using the JWT as a Bearer token, to make sure the JWT is recognized by Cloud ERP. At time of writing, there is not a REST based 'who am I' type service in Cloud ERP but we can make use of either a HR or Projects REST service which are available in R11 of Cloud ERP.
e.g. End Point for HR employee REST Service: https://<<host>>/hcmCoreApi/resources/latest/emps/1
We know employee id 1 does not exist, but that is not the point. We just need to make sure we don't get a http response of 401 (un-authorized). It is works, we should expect a 404 not found response.
Calling the Cloud ERP REST Service
l_url := 'https://<<host>>/hcmCoreApi/resources/latest/emps/1';
-- Set the HTTP Headers and the Token P10_JWT_BASE is derived from our page process above
apex_web_service.g_request_headers(1).name := 'Authorization';
apex_web_service.g_request_headers(1).value := 'Bearer '||:P10_JWT_BASE;
apex_web_service.g_request_headers(2).name := 'Content-Type';
apex_web_service.g_request_headers(2).value := 'application/vnd.oracle.adf.resourceitem+json';
-- Call the REST Service
l_clob := apex_web_service.make_rest_request(
p_url => l_url,
p_http_method => 'GET');
-- Get the HTTP Response Code. 404 means the JWT was valid but the service could not find the employee record (which is fine for our purposes).
l_http_status_code := apex_web_service.g_status_code;
The Cloud ERP Side
Now that we have an APEX application ready to be called we need to login to Cloud ERP to complete the mashup. There are several steps to this:
- Create a new Third Party Application
- Create a new Page Integration
- Locate the new Page in the Application Structure
- Adjust the size of the new Custom Page
Create a new Third Party Application
Navigation
Setup & Maintenance > Pull out the Tray on the Right Side > Manage Custom Setup Content > Manage Third Party Applications > Click the Plus Icon to Create a new one
The URL is the base URL to your APEX environment without the trailing '/'
e.g. https://www.example.com/ords
Setup & Maintenance > Pull out the Tray on the Right Side > Manage Custom Setup Content > Manage Third Party Applications > Click the Plus Icon to Create a new one
The URL is the base URL to your APEX environment without the trailing '/'
e.g. https://www.example.com/ords
Create a new Page Integration
First, create a new Sandbox, then create the Page Navigation as follows.
Navigation
> Navigator > Tools > Page Integration > Click the 'New Page' button
Enter a Name, select an Icon then select an Application Role for which the new page should be available. Next, click the golden key icon and another popup will appear, at which point, enter the following:
Navigation
> Navigator > Tools > Page Integration > Click the 'New Page' button
Enter a Name, select an Icon then select an Application Role for which the new page should be available. Next, click the golden key icon and another popup will appear, at which point, enter the following:
- For Web Application, select the third-party application created above.
- For Destination for Web Application, enter the end of the APEX URL as follows:
- f?p=101:10:::::P10_JWT:
- Where 101 is the application number and 10 is the page number.
- The colons are meaningful in APEX URLs so don't miss any out.
- Finally, enter jwt as the Secure Token Name and then click Save and Close
Locate the Icon for the New Page
To place the icon for our new page on the home page of Cloud ERP, follow these steps:
Navigation
> Navigator > Tools > Structure
Find and Expand 'Sales Performance Aux' and you should see your new page. Click the right Chevron and Select (Top Level). Now click on the Home Page and you should see your new icon.
Navigation
> Navigator > Tools > Structure
Find and Expand 'Sales Performance Aux' and you should see your new page. Click the right Chevron and Select (Top Level). Now click on the Home Page and you should see your new icon.
Adjust the Size of the New Page
You may want to adjust the height and width of the iframe. To do this, click the icon for your new page which is located on the Home Page. When the page opens, navigate to > Your User Name > Customize Pages. Size the window the way you want then click Close.
Conclusion
The above steps may seem complex at first glance. But when you consider we just integrated a highly sophisticated web based PaaS service (APEX) with Oracle Fusion Apps / Cloud ERP, it's pretty amazing. Also, don't forget that APEX itself has the ability to consume SOAP and REST services as well as host REST web services. That added to the native database scheduling features may be all you need for integrations. But thats not all folks, with the Exadata Express service, prices start at just $175/month for 20GB storage, 3GB PGA and 3GB SGA for a service that requires no configuration.
This all goes to show how versatile, powerful (and sometimes underrated) APEX in the Cloud is. In my opinion the Cloud will be APEX's coming of age and I expect many more great things to come.
This all goes to show how versatile, powerful (and sometimes underrated) APEX in the Cloud is. In my opinion the Cloud will be APEX's coming of age and I expect many more great things to come.


 RSS Feed